6. Medication administration.
-
6.1. Medication administration procedures
 A method used during medication administration to safeguard the clients; before administering the medication the QMAP must ask self-six questions – Am I giving the medication to the right client? Am I giving the right medication? Am I giving the right dose? Is this the right route? Is this the right time? Have I done the right documentation?
1. Right Client: – Asking a client his/her name, etc. It is important to identify the right person when administering medications. An example of this might be referring to the photograph inside the record, and/or having the person state his/her name if possible. It is imperative that the “right person” has been identified prior to administering medications. Most common method used for identifying clients before administering medications is photographs of clients in the medication administration record (MAR). Photos should be kept updated and photograph is to have the name of the client on it.
2. Right Time – when the client is ordered to receive the medication. Your agency should have a policy in place that provides a time frame for which it is acceptable to give medications (for example: 60 minutes before or 60 minutes after the scheduled time).
Timing of Medication Administration
- Important to understand timing in relation to administering medications, i.e., insulin and medications ordered to be administered on an empty stomach or in relation to meals
Timing of medications in relation to meals
- Before meals – medication generally administered within 30 minutes prior to the client eating meals;
- With meals – medication generally administered when the client is eating meals or right after finishing meals;
- After meals – medication administered after the client has finished eating meals up to 30 minutes afterward. Clients in the facility during the medication pass should receive their medications within a window of time one hour prior to and one hour after the scheduled administration time on the MAR, except in the case of medications prescribed for administration in relation to meals or medications such as insulin If unsure about giving a medication because it is outside the designated time frame;
- Contact a supervisor or a health care professional regarding the administration of the Client’s medications or to determine if prescribing practitioner should be contacted;
- The medication should not be omitted without contacting a supervisor or a health care professional or prescribing practitioner
Please note: For non-time, specific medications the facility may designate a timeframe or use “am” and “pm” (for the time slots on the MAR) as long as the information is included within their policies and procedures.
3. Right Medicine – the name of the medication ordered by the physician; always use the three checks Giving the right medication to the right person is imperative for safety. Ensure that the medication label coincides with the Medication Administration Record. Cross-check the label on the medication container with the MAR and the physician order three times. Once as the medication is taken off of the shelf, once as the medication is being poured and again when the medication is returned to the storage area.
4. Right Dose– the amount of medication ordered. Read the label on the medication container and compare it to the transcribed order. Pay close attention to the dosage amount.
5. Right Route– the method of medication administration. Read the label on the medication container and compare it to the transcribed order. Pay close attention to the route. Ensure that ear (otic) drops are never given in the eye.
6. Right Documentation– the process of writing down that medication was administered to the resident on the MAR and writing down if a medication ordered was not administered and the reason it was not administered Each medication must be documented when it is given. If a medication has been given, and it has not been documented that it was given, the process for administration is incomplete. This has the potential of causing a serious medication error, (overdosing) if the medicine were to be re-administered. It is very important to remember once the medication has been administered you should initial in the area indicated on the Medication Administration Record. Inaccurate medication counts are also considered as incomplete documentation, which constitutes a medication error.

-
6.2. Medication Administration and Client’s Rights – Importance and Examples
- · Respect – how the client is addressed:
– Do not interrupt client while eating for the administration of medications, such as oral inhalers and eye drops;
– Do not awaken client to administer a medication that could be scheduled or administered at other times;
– Inform client about the procedure that is about to be performed;
– Answer client’s question about medication.
- · Refusal – client has the right to refuse medications (7th “right”):
– Never force a client to take a medication
– Follow the facility’s policy and procedure when a client refuses medications (policy and procedure ensures that physician is notified in a timely manner based on client’s physical and mental condition and the medication.
- · Privacy – being away from the public:
– Knock on closed doors before entering
– Do not administer medications when client is receiving personal care or in the bathroom.
-
6.3. Medication Education and USE OF MEDICATION REFERENCES
Each individual should be encouraged to ask for and receive information regarding the medications prescribed. Education is to be documented in an agency-specific manner.

Education of each individual should be performed per agency policy and should include:
- Name of prescribing practitioner;
- Trade and generic name of the medication;
- Reason medication was prescribed (diagnosis or symptoms);
- Dosage of the medications;
- Time the medication will be given;
- How long the medication is prescribed for;
- Most common side effects of medication.
USE OF MEDICATION REFERENCES
Every person who administers medicines should know or have access to information regarding each drug’s intended use, side effects, adverse reactions, warnings, and special considerations. Appropriate medication dosage and the route of administration must be known. It is standard practice for a person who is administering medications to:
- Have a current drug reference available(Mosby’s 2017 Nursing Drug Reference / Edition 30, Mosby’s 2018 Nursing Drug Reference, 31e (SKIDMORE NURSING DRUG REFERENCE);
- In addition, a medical dictionary would be helpful.
- Have knowledge of name(s) – generic, and trade names of drugs administered in the facility;
- Have knowledge of common adverse reactions – according to the various body systems;
- Have knowledge of common drug interactions.
Other sources of drug information include:
- Your local or consulting pharmacist;
- Medication inserts or Various Internet sites.
-
6.4. Preparing for Safe Medication Administration
A. Use a designated area to prepare and administer medications. The area must be: - Clean & free from clutter;
- Well lit;
- Have adequate supplies available.
B. Practice good hand hygiene and/or universal precautions:
- Wash your hands prior to preparing medications and anytime there has been any physical contact;
- Use gloves when instilling eye or ear medications;
- Be aware of allergies to latex;
- Wash your hands to remove powder from gloves.
C. Educate Yourself on the Medication:
- Provide an adequate amount of water for easy swallowing;
- Review medicines that require checking of vital signs.
D. Follow the Six Client Rights When
- Removing the medication from storage;
- Removing the medication from its container;
- Returning the medication to storage.
E. Identify yourself and what you are doing.
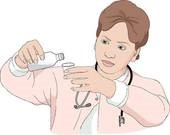
F. When measuring liquid medications:
- Have available a medication dispensing device or oral syringe;
- Pour the medication away from the label;
- Have the container eye level when measuring;
- Pay close attention to the order and the measurement markings on the container.
G. Give the medication and observe the client taking it:
- Monitor for choking.
H. Document.
I. Observe the client after they have taken the medication & report to the Nurse:
- As soon as possible, any change in the patient’s normal condition, call 911 and report to nurse if any emergency situation occurs (allergy reaction, shock, short of breathing, chocking, swollen face and neck.)
-
6.5. Important Infection Control Concepts during Administration of Medication
Universal precautions were developed in the 1980’s as a means of avoiding contact with blood-borne (carried in the blood) “pathogens” or infections. The method used was wearing nonporous gloves to avoid contact with any and all blood; all patients were assumed to be infected.
- Since that time, “universal” has been expanded to “standard” precautions covering more body fluids and more body sites: blood, secretions (eyes, nose, ears, mouth), excretions (vomit, urine, and feces), non-intact skin, mucous membranes. Standard precautions must now be observed for all clients at all times in all contacts.
- Because the administration of medication by some routes will involve physical contact with body sites, it is important for QMAP’s to routinely follow standard precautions with clients during the administration of medications.
- Important Infection Control Concepts during the Administration of Medication
- Use sanitary technique when pouring or preparing medications into an appropriate container
- Do not touch or handle medications, but pour medication from the original medication container into a new, appropriate medication container; give the new container to resident
- Never use your own hands to administer medications and never require the resident to have to use his/her own hands to receive medications
Standard Precautions.
- Wear gloves when there may be exposure to bodily fluids or mucus membranes, such as the vagina, rectum, inside of the nose, and the eyes;
- Wash hands with soap and water, or with an alcohol-based hand rub if hands are not visibly soiled or if there has been no contact with bodily fluids;
- Wash hands before and after removal of gloves;
- Wash hands before and after using shared medical equipment.
-
6.6. Proper Hand Washing
Good handwashing techniques include washing your hands with soap and water or using an alcohol-based hand sanitizer.
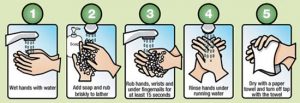
Washing Hands Using Soap and Water

- Remove rings;
- Wet your hands with warm, running water and apply liquid soap;
- Lather well;
- Scrub all surfaces, including the backs of your hands, wrists, between your fingers and under your fingernails;
- Rub hands together for 15- 20 seconds (sing “Happy Birthday” twice);
- With water running, dry hands with a paper towel;
- Use a paper towel to turn off the faucet;
- Dispose of paper towel.
Your Hands – Other Important Points
There are other things you can do to prevent the spread of infection:
- Fingernails;
- Keep nails short and clean;
- Do not wear fake nails, gel nails or nail extensions, because they can hide harmful germs;
- Jewelry;
- Leave at home because harmful germs can stick to jewelry.
Alcohol-based hand sanitizers are an excellent alternative to hand washing. However, it your hands are visibly soiled, wash with soap and water.
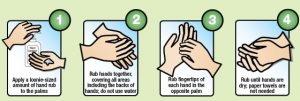
Washing Hands with an Alcohol-Based Hand Sanitizer.
- Apply ½ tsp of the sanitizer to the palm of your hand;
- Rub hands together, cover all surfaces of your hands until they are dry;
- Rub hands, palm to palm;
- Rub right palm over left-back of hand with interlaced fingers, and then switch;
- Rub palm to palm with interlaced fingers;
- Rub backs of fingers to opposite palm with fingers interlocked;
- In rotational motion, rub left thumb while clasping in the right palm, and then switch;
- In a rotational backward and forwards motion, rub left palm with clasped right fingers, and then switch;
- Grasp right wrist with the left hand; then switch.
Washing hands is the single most important measure to prevent contamination as well as the spread of infection.
-
6.7. Gloves
- The most common type of Personal Protective Equipment worn with medication administration;
- Description;
- Non-sterile (clean) gloves made using different materials, such as vinyl or latex; if allergic to latex, wear non-latex gloves;
- Come in different sizes.
Gloves – Rules:
- Should be worn once and then thrown away;
- When wearing gloves, always work from (or touch) a clean area, before touching contaminated (or dirty) area;
- Change gloves if hands are going to move from a body part that is contaminated (dirty) to a body part that is not contaminated (clean);
- Change gloves right away if dirty or torn;
- Take gloves off carefully and do not touch skin or clothes with dirty sides of gloves;
- Do not touch anything with dirty gloves that anyone may touch without gloves, like a doorknob;
- Should be comfortable – not too loose or not too tight.
Gloves – When to Wear
- Wear gloves any time care worker will or think will come into contact with blood or body fluids (urine, stool, spit, mucus coughed up);
- Wear gloves any time health care worker will or think will come into contact with non-intact skin (opened up skin, such as sores or cuts);
- Wear gloves any time health care worker will or think will come into contact with mucus membranes (linings of natural body openings);
- Inside or outside of the rectum;
- Inside of the mouth;
- Inside of the nose.
Examples of when to always wear gloves:
- When you might touch blood, body fluids, non-intact skin, or mucus membranes;
- Providing or assisting with mouth care;
- Wiping a nose that is draining;
- Providing perineal care (the genitals and the buttocks);
- Caring for a resident with cuts and sores;
- Performing a finger-stick blood sugar;
- Touching a surface or equipment that is contaminated or maybe contaminated;
- If the staff has open sores or cuts on own hands.
Gloves should be worn and hand hygiene must be performed when transdermal products, i.e., Nitroglycerin or Duragesic patches, are applied or removed
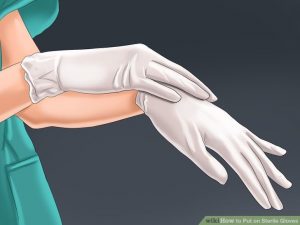
Gloves – How to Put On (Don)
- Select correct size and type;
- Insert hands into gloves Interlace fingers and smooth out folds creating a comfortable fit; and;
- Carefully look for tears, holes, or discolored spots;
- Special notice: when gloves and gowns must be worn, ensure that each glove is extended over the gown cuff.
Gloves – How to Remove
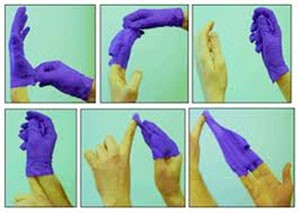
- Grasp outside edge of one glove near wrist;
- Peel glove away from hand turning glove inside-out, with the contaminated side on the inside;
- Hold the removed glove in the opposite gloved hand;
- With ungloved hand, slide one or two fingers under the wrist of the other glove. Being careful not to touch outside of the glove, peel off the second glove from inside, creating a bag for both glove;
- Discard (Used gloves contaminated with body fluids should be disposed of in containers with plastic bags that are knotted prior to disposal, to protect janitorial staff. You must be familiar with your facility’s policies and procedures about the disposal of gloves and other materials (incontinence briefs, wipes, etc.) contaminated with.
- Wash hands!
-
6.8. Additional safety procedures before administration of medications
- Gather the client’s medication from storage and verify that the medication has not expired;
- Check the resident’s MAR for allergies;
- Sufficient fluids available to administer medications;
- Gather other equipment needed for the type of medication to be administered:( Keep supplies and equipment used in administering medications clean and orderly, such as medication carts, trays and pill crusher):
— Medication administration records (MAR)
— Oral medications (tabs, caps): gloves (if needed), pill cutter (if needed), tweezers, paper medicine cup
— Oral medications (liquids): gloves (if needed), medicine cup, plastic or glass measuring cup
— Ear drops, eye drops or ointment, nose drops or nasal spray: gloves, cotton balls or tissues
— Suppositories: gloves, medicine cup, a lubricant such as K-Y jelly
— Transdermal skin patches: gloves.
In case of emergency follow facility policies and procedures.
If the person can cough or make sounds, let him or her cough to try to get the object out. If you are worried about the person’s breathing, call 911.
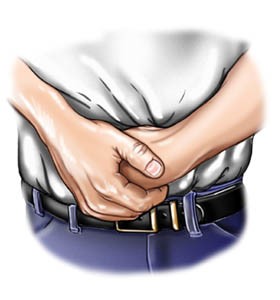 If the person can’t breathe, cough, or make sounds, then Heimlich thrusts:
- Stand or kneel behind the person and wrap your arms around his or her waist. If the person is standing, place one of your legs between his or her legs so you can support the person if he or she faints.
- Make a fist with one hand. Place the thumb side of your fist against the person’s belly, just above the belly button but well below the breastbone.
- Grasp your fist with the other hand. Give a quick upward thrust into the belly. This may cause the object to pop out. You may need to use more force for a large person and less for a child or small adult.
- Repeat thrusts until the object pops out or the person faints.
If a person faints.
- Start CPR (cardiopulmonary resuscitation) if you are know-how.
- If you do rescue breaths, look for an object in the mouth or throat each time the airway is opened during CPR. If you see an object, remove it.
- Do not do any more Heimlich thrusts.
- Keep doing CPR until the person is breathing on his or her own or until help arrives.
In case of other clients or employee’s emergency conditions or occurrences follow facility policies and procedures.
-
6.9. Unique Situations to do prior to Administration of Medications

- Take the medication and your other supplies to the client, or have the client come to your administration area. Be sure any area used to administer medication is neat and clean.
- Identify the client. You may ask the client their name and compare it with a photograph, or ask a staff person to assist in verifying. Never ask another client to participate in identifying a client. Be aware of privacy and dignity issues when selecting an area to administer.
- Explain the procedure to the client to obtain cooperation.
- Wash hands or use hand sanitizer, put on gloves (if needed).
- No pre-pouring medications.
 Vital Signs
– When a vital sign is to be obtained before administering medication, obtain the vital sign results before preparing the medication for administration;
– Examples – pulse or blood pressure.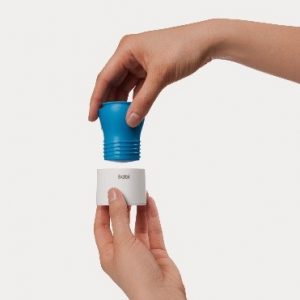 Crushing Medications and Mixing in Food
– Do not crush medications until immediately before the medications are administered
– The devices used to crush medications may vary in facilities;
– The most common method – using a pill crusher and crushing the medications using two medication soufflé cups;
– If the medications are unit-dose, the employee may crush the medication in the unit dose package and empty into a medication cup;
– A mortar and pestle may also be used; to avoid cross-contamination when crushing medications and the residue from the medication is present, the device must be cleaned thoroughly before crushing another client’s medication. -
6.10. Steps and procedures for the different routes of Medication Administration(Oral)
 Ingestion: oral tablets/capsules: Oral Medications in Solid Form
- Appropriate positioning of a client, the elevation of the head the client should be sitting up or standing to take oral medications, not lying down.
- Place capsules or tablets for a client in medication or soufflé cups for administration. When pouring tablets/capsules, put on gloves or use the lid of the container to pour the medication, then drop the medication into a medicine cup. Avoid handling medications with fingers as you may accidentally damage or drop pills, use tweezers if necessary to move medications into the medicine cup. Other packaging options include but are not limited to blister packs and pre-filled ready medication packs.
- Administer powdered medications such as bulk laxatives with the number of fluids indicated;
- Offer client sufficient fluids following the administration of oral medications even if the medication is administered in a food substance or the medication is a liquid. Offer a drink of liquid before and after each medication. Use a straw if necessary.
- Observe the client taking the medication to assure the medication is swallowed before documenting the administration of the medications;
- For clients who have difficulty swallowing medications, the following techniques may be helpful to gain cooperation, as well as assist the client to take all medications:
– Offer tablets/capsules one at a time. If necessary, place the medication in the middle of the client’s mouth. Allow the client to rest a short time after each med (QUIETS THE COUGH REFLEX). Allow enough time for the client to take the medication.
– Some tablets or capsules may be easier to swallow if given in a teaspoon of jelly or applesauce if permitted on the client’s diet. Be sure to tell the client that there is medication in jelly or applesauce. You may not trick the client with disguises for meds. The physician must be consulted and an order written to add medications to food.
– Some clients request their medication to be crushed. Do not crush enteric-coated tablets. You may not crush or open any medication without a physician order approving this procedure. If the client has continued difficulty taking oral medications, report this to the person in charge of client care. The physician may need to be consulted. Many medications are available in another form.
– Remain with the client to be certain all oral medications have been swallowed. This also ensures that the medication is taken on time. In some instances, checking the client’s mouth may be indicated to verify swallowing the medication.
- Lozenges are not to be swallowed. Instruct the client to allow the medication to dissolve in the mouth. Drinking liquids should be avoided until the medication has completely dissolved. These medications should be given last after other oral medications.
 Ingestion: sublingual (sl) tablets: Sublingual Medications
- Place the medication under the client’s tongue in the front part of the mouth. If several medications are being given, give the sublingual tablet last.
- Instruct client not to chew or swallow the medication until the tablet is entirely dissolved
- Do not follow with liquid, which might cause the tablet to be swallowed
- Nitroglycerin SL tablets:
a) Instruct the client to sit down (NOT to lay down) upon the first indication of angina (chest pain), administer nitro SL and immediately notify your supervisor of the situation.
- Notify supervisor;
- Follow physician’s orders;
- Record the exact minute of administration on the MAR;
- Consult the client’s record to see if there is a physician order for aspirin to be given when chest pain occurs.
b) After one dose of nitro SL is given and chest pain is not relieved, you or your supervisor must follow facility procedures to provide prompt medical attention.
- Call 911 for paramedics and transport to an emergency room.
c) If chest pain resolves within 5 minutes, advise the client to sit for an additional 15-20 minutes to prevent dizziness or fainting. Headaches are a common side effect of the drug and should last no longer than 20 minutes. If headaches persist, notify the supervisor.
d) Be sure to tightly recap the nitro SL bottle
- Replace the medication supply every 6 months.
e) Stay with the client until chest pain is resolved.
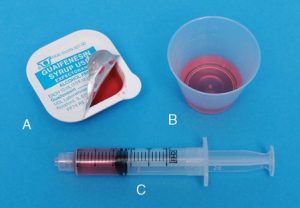 Ingestion: oral liquids and gargles: Liquids
- Never approximate the amount of medication to be administered, such as liquids;
- The amount ordered is to be the amount administered;
- Use a calibrated syringe for measuring liquids in amounts less than 5 ml and unequal amounts;
- When measuring liquids place the medication cup on a flat surface and measured at eye level to ensure accuracy for liquids, hold the medication container so that the medication flows from the side opposite the label so it doesn’t run down the container and stain or obscure label;
- Do not mix liquid medications together;
- Check to see that the cap of the bottle is securely. Remove the cap and place it with the open side up (top of the cap down);
- Locate the marking on the medication cup for the amount of medication to be poured;
- Pour immediately prior to administering, liquid medication may not sit for any length of time;
- Clean the lip of the bottle, if necessary, with a moist paper towel/tissue before recapping;
- Gargles are solutions that are bubbled in the throat by keeping the solution in the upper throat, tilting the head back and exhaling air to create bubbling. Check directions with gargles to know whether the medication should be diluted prior to administration;
- Measure liquid medications in a calibrated medication cup/device; never use eating utensils or other household devices for administering medications;
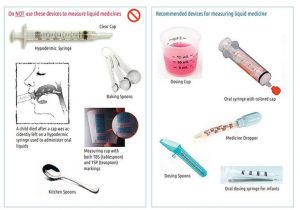
- Certain medications have special measuring devices for administering the medication; these measuring devices have increments marked off in mgs; instead of mls and usually have the name of the medication on the measuring device;
- Liquids may have administration requirements such as “Shake Well and Requires Dilution” prior to administration. Read instructions to determine if contents are to be shaken as with suspensions. A rotating wrist movement will ensure a more thorough mixture.
Examples of these liquids are Dilantin Suspension, which must be shaken thoroughly because the medication settles and gives inconsistent dosing; some liquids, i.e., liquid Potassium, must be mixed with sufficient fluids to decrease side effects.
-
6.11. Steps and procedures for the different routes of Medication Administration (Applications)
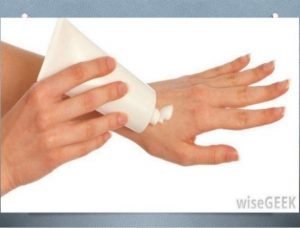
Application: ointments, lotions, liniments, and aerosols: Topical Medications
- Wash hands thoroughly.
- Wear gloves and use tongue blade, gauze or cotton tipped applicator to apply medication. Gloves should be worn whenever coming into direct contact with medication or a client’s skin. Never use your bare fingers to apply ointments, lotions or liniments. Do not discard gloves and supplies in areas accessible to clients.
- Directions for application of the medication should be a part of the physician’s order or included with the instructions accompanying the medication. Apply the cream or ointment as directed by the label or the doctor’s order.
- Cleanse the skin with warm water and soap.
- Place the lid or cap of the container to prevent contamination of the inside surface.
- Ointments are applied directly to the skin or placed on a dressing that is then applied to the skin. A tongue blade may be used to remove ointments from a jar or container. You may also use the tongue blade as an applicator. Use a new applicator each time medication is removed from container to prevent contamination.
- Lotions are applied / swabbed on the skin for their antiseptic and/or astringent effects.
- Liniments are vigorously rubbed into the skin to relieve soreness of the muscles and joints.
- Aerosols are sprayed onto the skin. Spraying is less painful if skin is irritated or burned. Have client turn head away from aerosol spray.
NOTE: When transcribing orders for applying ointments, be sure to indicate where the ointment should be applied.
- Notify the nurse if you notice: a change in the amount, color, consistency, or odor of the drainage or if there is any swelling or redness.
Application: Transdermal patches:
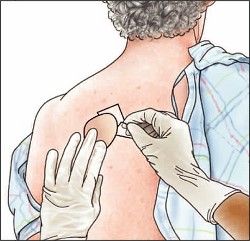
A transdermal skin patch is impregnated with medication which, when applied to the skin, releases a continuous and controlled dosage over a specified time period.
- Gloves should be worn to apply/remove transdermal patches to avoid contact with the patch.
- Remove the old patch, if present.
- Wash client’s skin with soap and water (both new site and removal site).
- Rotate application sites to avoid skin irritation. If previous sites are blistered, notify your supervisor.
- Peel backing off the patch, press on skin and apply pressure to assure skin adherence.
- Include the site of application with documentation on the MAR.
- Write your initials, date and time on the patch after applied.
Application: eye drops/eye ointments:
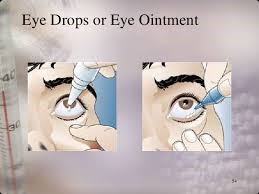
- Wash hands prior to and after administration of eye drops and ointments;
- Instruct client about procedure. Assist the client to sit or lie down with head tilted back.
- Cleanse the eye(s) with a clean tissue, clean, wet washcloth or cotton ball. Always cleanse from the inside of the eye, near the nose, to the outside. Use a clean tissue or cotton ball for each wipe.
- Follow standard precautions.
- Wear gloves as indicated. Always wear gloves when there is redness, drainage or possibility of infection.
- Remove cover of container, place lid with the open side up. (or in a clean medicine cup).
 Do not touch eyes with a dropper or medication container.
- Remove the cover of container, place lid with the open side up. (or in a clean medicine cup).
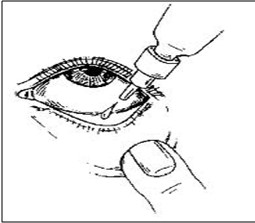
- Retract lower lid (make a pocket). Holding the bottle, no more than one inch from the lower lid, instill one drop in the center of the lower lid. Repeat procedure for the second drop, if ordered. Wait 3-5minutes if multiple eye drops are ordered, to allow time for absorption.
- After application, instruct the client to look downward, then close eye(s) for a short time.
- Give the client a clean tissue or cotton ball to wipe the excess.
- Procedure for ointment: instruct client to lookup. Retract the lower lid (make a pocket). With care to avoid touching the eye with the tip of the tube, lay a thin strip along the lower lid.
Application: ear drops: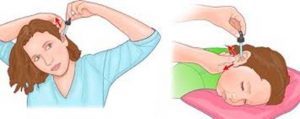
- Wash hands before and after administration of medication.
- Gloves are to be worn as indicated.
- Gently shake the bottle Hold the dropper tip down at all times.
- Clean external ear canal with a clean tissue or cotton ball.
- Hold ear lobe in such a manner (n adults, hold the earlobe up and back, in children, hold the earlobe down and back) to allow visualization of the ear canal by gently pulling on the ear, straighten the ear canal (If lying in bed, have bed flat and turn head to the opposite side, if sitting up, tilt head sideways until the ear is as horizontal as possible).
- Instill an ordered number of drops without touching dropper to the client’s external ear.
DO NOT SQUEEZE THE DROPPER TOO HARD
- Place a small wad of cotton in the external portion of the first ear. If it is necessary to instill drops in both ears, you should wait at least five minutes before instilling drops in the other ear and place wad of cotton.
- Request the client to remain in the same position for 5 minutes to allow the medication to penetrate.
- Gently plug the ear with cotton to prevent excessive leakage if necessary.
- Return to the client in 10 minutes to remove cotton wads; forgotten cotton wads can become difficult to remove.
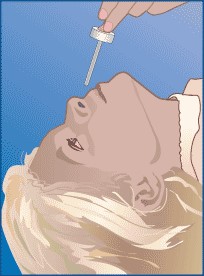
Application: nose drops/nasal sprays:
- Wash hands before and after.
- Gloves are to be worn as indicated.
- For drops, client should lie down on his/her back with head tilted or the client may sit up for nasal sprays.
- Place the nose dropper just inside the nostril. Instruct the client to “sniff” on the count of three and instill the correct number of drops. Instruct the client to remain with head back for a short time.
- Request the client to remain in the position for about 2 minutes to allow sufficient contact of medication with nasal tissue.
- Avoid touching the dropper or spray nozzle to the client’s nose. If it happens wipe tip of the applicator with an alcohol swab.
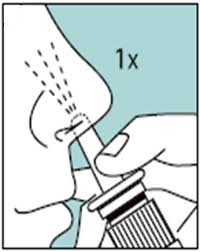 For Sprays before using a nasal spray, the client should blow the nose.
- Hold head erect and spray quickly and forcefully while the client “sniffs” quickly or instructs the client to sniff on the count of three as you squeeze the nasal spray. This will help to coordinate the client’s sniffing with the application of the medication.
Optional: Close one nostril while spray is applied to the other nostril.
- Have the client tilt head back to aid penetration of the medication into the nasal cavity, if necessary.
- Wipe dropper or sprayer with a tissue before replacing the cap.
-
6.12. Steps and procedures for the different routes of Medication Administration (Inhalation).
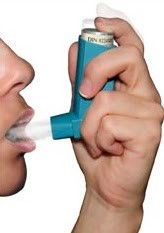
Inhalation: inhalers
- Spacing and proper sequence of the different inhalers is important for maximal drug Effectiveness;
- The prescribing practitioner may specifically order the sequence of administration if multiple inhalers are prescribed or the pharmacy may provide instruction on the medication label or MAR;
- Wait at least one minute between puffs for multiple inhalations;
- The client should be in a sitting position. Wash hands, apply gloves;
- Grasp the medication dispenser and remove the mouthpiece cover;
- Read instructions on inhaler to determine if medication is to be shaken;
- Hold the dispenser’s mouthpiece according to package directions.
- Instruct the client to exhale, and, on the count of three, to breathe in deeply as you administer the medication, then hold their breath for as long as possible, before exhaling;
- It is best to have clients rinse their mouth after administering inhalants. Many times, inhalants taste bitter or can cause thrush;
- Using an alcohol swab, clean the mouthpiece or spacer before replacing the mouthpiece cover.
How to Use Spacers

- Ask the client to sit up straight, or stand up, and lift the chin to open the airways. Remove the cap from the mouthpiece of the inhaler and shake the inhaler vigorously.
- If you haven’t used the inhaler for a week or more, or it is the first time you have used the inhaler, spray it into the air before using it to check that it works;
- Insert the inhaler mouthpiece into the hole in the end of the spacer (the inhaler should fit snugly and without difficulty – see below);
- Instruct the client to take some deep breaths and then put your teeth around the spacer mouthpiece (not in front of it and do not bite it), and seal lips around the spacer mouthpiece, holding it between the lips;
- Press down on the canister in the inhaler to spray one puff of medicine into the spacer;
- Instruct to breathe in slowly and deeply, then hold a breath for 10 seconds or as long as is comfortably possible. Breathe out, then breathe in deeply again through the mouthpiece of the spacer and hold a breath. Client should take two deep-held breaths from the spacer for each puff from your inhaler;
- If you need another dose, wait 30 seconds, shake your inhaler again then repeat steps 4 to 8;
- Don’t spray more than one puff at a time into the spacer. This makes the droplets in the mist stick together and to the sides of the spacer, so client actually breathes in a smaller dose.
NOTE: Follow the manufacturer’s instructions for cleaning all of the above.
-
6.13. Steps and procedures for the different routes of Medication Administration(Insertion).
Insertion: rectal/vaginal suppositories or creams
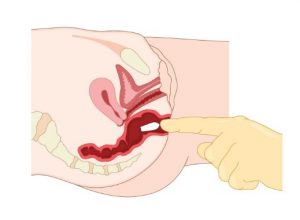 Rectal Suppository – A rectal suppository is a medicine shaped like a cone or cylinder that is inserted into the rectum. It is made of a waxy substance that melts easily. To administer a rectal suppository:
- Provide privacy for the client.
- Wash your hands thoroughly.
- If the suppository is soft; hold it under cool water to harden it before removing the wrapper. Remove the wrapper.
- If you are to use half of the suppository, cut it lengthwise.
- Put on a finger cot or a disposable glove.
- Lubricate the suppository tip with a water-soluble lubricant such as KY Jelly.
- Assist the individual to lie on their left side with their lower leg straightened out and upper leg bent forward toward their stomach. The colon is on the left side of the body and the suppository will enter the lower GI tract more easily.
- Lift upper buttock to expose the rectal area.
- Insert the suppository, pointed end first, with your finger until it passes the muscular sphincter of the rectum, about 1 inch in adults. If not inserted past the sphincter, the suppository may pop out.
- Hold buttocks together for a few seconds. Ask the individual to remain lying down for about 15 minutes to avoid having the suppository come out. Instruct the client to not to “bear down,” and to hold in the suppository for as long as possible.
- Discard used materials and wash your hands thoroughly. to prevent the suppository from being expelled.
Vaginal Suppository or cream–
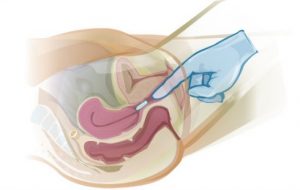
- Wash your hands thoroughly.
- To use the cream, fill the applicator that comes with the cream to the level indicated.
- To use the suppository, unwrap it, wet it with lukewarm water, and place it on the applicator shown with the accompanying instructions.
- Assist the client to lie on her back with knees drawn upward and spread apart. in a “frog leg” position (dorsal recumbent position).
- Insert the applicator high into the vagina (unless she is pregnant), and then push the plunger to release the medication. Vaginal suppositories are inserted 2-3 inches into the vaginal orifice. Body temperature will melt the suppository to aid in the absorption of the medication. To insert a vaginal cream, grasp the barrel of the applicator. Place the thumb on the plunger. Pointing the applicator slightly downward, insert the applicator into the vagina as far as it will comfortably go.
- Push the plunger with the thumb as the applicator is slowly removed from the vagina.
- If she is pregnant, insert the applicator gently. If you feel resistance (hard to insert), do not try to insert it further; notify the doctor.
- Withdraw the applicator.
- Instruct the client to remain lying down for 15-30 minutes for absorption of the medication. Vaginal creams/suppositories are best administered at bedtime. Pull the applicator apart and clean it with soap and warm water after each use.
- Wash your hands thoroughly.
NOTE: The dose should be applied when the client lies down to go to bed. The medicine works best if she does not get up again after applying it. You may to provide a sanitary napkin to protect clothing against stains.
-
6.14. Steps needed after medication administration is completed, Disposal of unused medication or expired medication
- Cleanse hands.
- Initial the MAR immediately after the medication is administered and prior to the administration of medications to another resident QMAP must accurately document each medication given on the client’s MAR immediately after administration or monitoring. For PRN medications, remember to document the client’s request and the reason for giving the medication as well as the follow-up results.
- Correctly document any medications that are refused or not administered.
Disposal of unused medication or expired medication:
- Properly dispose of all used medication cups and used gloves which have come into contact with body fluids. You must wash your hands or use sanitizer before you move onto the next client.
- Medication containers should be returned to the appropriate storage location after administration. If medications have been removed from the original container they should not be returned to the original containers. They should be destroyed according to facility policy.
- Expired and Unused Medications The expiration date is one year after medication was filled (generally) or the expiration date on the medication container. Medications remaining past the expiration date are not to be administered. Expired and unused medications should be disposed of in accordance with facility policy. Generally, medications should be made unusable and discarded in the garbage.
You can take the medications out of their original containers and mix them with an undesirable substance, such as used coffee grounds or kitty litter and a small amount of water to dissolve the medication. This should render the medication unusable. Or for example:
- For pills: pour glue into pill container, after glue is hardened, container may be thrown into garbage can;
- For liquids: pour cat litter or sand into container and wait for it to set-up, after it becomes hardened, it may be thrown into garbage can;
- Disposal of medication must be documented on the medication record to verify it was destroyed, sign, date and have a witness also sign and date;
- Items such as inhaler canisters may be placed in a sharps container or disposed of according to OSHA.
The personal and prescription information on the medication containers should be removed or obscured by using a permanent marker or placing duct tape over the information. Put the mixture in a sealable bag, empty can, or another container to prevent the medication from leaking or breaking out of a garbage bag.
Do not flush the meds or pour down drain Medications should not be flushed down the toilet or poured down the drain unless the label or package instructions direct otherwise, this is most often seen with controlled substances. The destruction and disposal of controlled substances must be documented on the count form for each drug and witnessed by two QMAPs or other healthcare staff. Look for drug take-back programs in your area. These programs will incinerate the drugs as biohazardous waste which is more environmentally friendly.
 Refill through date is variable and determined by the prescribing authority.
Each agency must have a policy to identify the process for disposing of unused, damaged, or expired medications
-
6.15. Quiz 6 (check yourself).
1. You only need to check the Five Rights and Rule of Three the first time you give the medication. After that you no longer need to perform this task for this medication order.
True or False.
2. The route of a medication has no effect on its absorption rate.
True or False.
3. If a client has an order for a medication, he/she has a right to refuse and there should be a policy on consequences for refusing to take medication.
True or False.
4. Which routes of medication administration should you wear gloves to assist with?
a) Rectal, ophalmic;
b) Topical, transdermal, nasal;
c) Enteral, otic;
d) None of the above;
e) All of the above.
5. What position should the client be when you are inserting a suppository?
a) Laying on the left side with his knees drawn up towards his chest.
b) Laying on the right side with his legs straight.
c) Laying on his left side.
d) Laying on the right side.
6. You would give a capsule form medication:
a) By mouth;
b) By G-tube;
c) In the ear;
d) Rectal.
7. How should you position a patient after instilling vaginal medication? (explain)
8. You should sign off the medication that you administer:
a) whenever you have the time.
b) soon after successfully administering the medication.
c) at the end of the shift.
d) before giving them to the individual.
9. Which of the following is NOT one of the six rights of medication administration?
a) Right physician;
b) right medication;
c) right route;
d) right time.
10. The accepted method of administering eye drops, after retracting the eye lids is:
a) put the eye drop solution on a Q-tip and gently swab it onto the eye.
b) gently position the eye dropper directly over the eye ball and squeeze the dropper.
c) Gently place the eye dropper on the inside corner of the eye and squeeze the dropper.
d) Gently draw the lower lid down and place the drops on the inside of the lower lid.
Answers module 6:
1. False 2. False 3. True 4. e 5. a. 6.a 7. dorsal recumbent or “frog leg” position.
8. b 9. a 10. d