Ambulation.
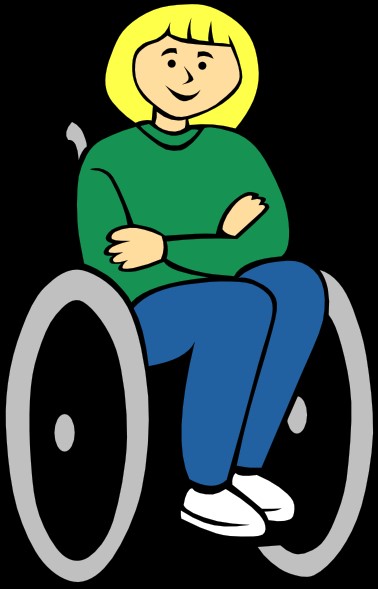
Ambulation is the action of walking for which the care recipient may need your help. The physical therapist will set up a plan for both of you to follow. The different types of equipment used to help support people when walking include canes, crutches, and walkers. Each device is adjusted by the physical therapist for a specific elder. The place where the elder holds the walking device should be level with the hip, with the elbow slightly bent. NEVER readjust the devices yourself. Mobility means to move from place to place. Ambulation devices increase mobility. Sometimes, these devices are not enough to allow the care recipient mobility. A wheelchair may be needed instead. The use of a wheelchair involves some special considerations. Remembering to lock the brakes on the wheels when transferring the care recipient into and out of it is very important. Always push the wheelchair from behind except for in an elevator and going down a ramp when you should pull the wheelchair.
Assistive devices in ambulation
1. Gait belt (transfer belt).

2. Cane, Quad cane, Hemi cane
3. Walker
4. Crutches
5. Whealchair.
Using a Transfer Belt
- Wash your hands.
- Explain to the care recipient what you are going to do.
- Assist the care recipient to a sitting position.
- Apply the belt around the care recipient’s waist over clothing. Never apply the belt over bare skin.
- Tighten the belt so it fits snugly. Provide only enough room for your hands to fit under it. The buckle should be at the side or back of the care recipient.
- Stand in front of the care recipient and grasp the belt from underneath and at the sides. Use good body mechanics.
- Have the care recipient push up with hands from the bed or chair.
- Brace your knees and feet against the care recipient’s body.
- Raise and lower the care recipient using good body mechanics.
- Wash your hands when completed.
A transfer belt is used when a client has a problem changing to a new position, when they need assistance, or a boost. Use the belt to grasp the client and help lift or guide them through a transfer or to walk. Personal care PCP/PCW ‘s are expected to have the transfer belt handy at all times.
Guidelines for using the transfer belt for a sit-stand-sit transfer: Plan ahead. Think through the transfer.
- Position the chair or commode at an angle from the client’s current sitting position on their stronger side.
- Apply the belt snugly around the person’s waist, over clothing. Avoid pinching excess skin with the belt. (Place the belt under the pendulous breasts of a woman, above the large abdomen).
- Tuck in the tail of the belt.
- Be sure the client has shoes or non-skid house-shoes on.
- Explain what you will do and what the client needs to do.
- Tell the client to move to the forward edge of the bed or chair. Be sure their feet are flat on the floor. You may need to help by placing one hand behind their hips and the other under their thighs. Ease the client forward in the chair. Follow the “back protection guidelines” and get as much help as you can from the client.
- Be aware that the client’s skin can be injured by abruptly sliding across the chair or from your applying too much pressure with your fingertips as you move them.
- Position yourself directly in front of the client. Place your feet apart to give you a broad base of support. Block their feet with your feet. Brace your knees against the client’s knees. Bend your knees; keep your back as steady as possible. (Keep a relaxed back and allow for the natural curve at your waist. Leaning or bending slightly forward is okay.) If the client is able, have them assist by pushing off from the chair or bed. If unable to assist, have the client place their hands on your shoulders or upper arms (but not around your neck).
- Grasp the belt at the sides or around the back of the client with fingertips pointed upward.
- Count to three. On three, assist the client to a standing position and pause long enough for them to feel steady.
- Direct the client to step or pivot in the direction of the commode or chair, then, back up until they can feel the edge of the chair on their calves. Firmly guide them in that direction, keeping your knees braced against theirs.
- Keep a firm grip on the transfer belt and keep the client close to your center of gravity. Move with them.
- Instruct the client to place their hands on the arms of the chair and to sit when ready.
- Slowly bend your knees, keep your back straight, and lower the client into the chair or commode. Remove the belt.
- You should always have the client move toward the stronger side during transfers and when getting out of bed. The strong side moves first and pulls the weaker side along.
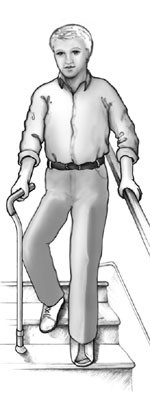
Using a Cane
- Wash your hands.
- Explain to the care recipient what you are going to do.
- Make sure care recipient is appropriately dressed.
- Apply a transfer belt and help the care recipient to stand.
- Have the care recipient grip the cane for support. ☺ Single point cane – usually held with strong side ☺ 3 – 4 point cane – usually held with weak side.
- The care recipient moves the cane forward, usually about 12”.
- The care recipient moves the feet forward – usually weak leg first, then strong leg.
- Assist the care recipient as needed.
- Wash your hands after completed with procedure.
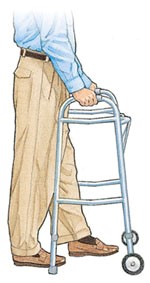
Using a Walker
- Wash your hands.
- Explain to the care recipient what you are going to do.
- Make sure care recipient is appropriately dressed.
- Apply a transfer belt and help the care recipient to stand.
- Have the care recipient hold firmly onto the side grips of the walker.
- Lift and move the walker 8 – 12” forward, using the arms to lift, not the back. Feet should be kept still. 7. The care recipient then moves the feet forward, while holding the walker still with his/her hands. Move a weak leg first.
- Assist the care recipient as necessary.
- When completed with procedure, wash your hands.
Assisting with Walking
These techniques should be followed when walking with any unstable or elderly person, even if he is not using an assistive device, like a walker or cane. ··
- Stand on the client’s weaker side and a little behind. Keep one hand ready by the client’s waist. Use your other arm to hold the client’s upper arm that is closest to you. If the client begins to fall, you are in a good position to support the client and ease them to the floor.
- If the transfer belt is used, apply it before the client begins to walk. Stand on the weaker side and a little behind the client. With your hand that is closer to the client, grasp the gait belt at the client’s waist, at their side or back. With your other hand, hold the client’s upper arm or forearm.
- While walking with the client, start with the same foot the client does and keep in step. Encourage the client to look up when they are walking. Accidents are more likely to happen when the client is looking down.
- While helping the client to walk upstairs, stay a step or two below the client and grasp the transfer belt.
- While helping a client walk downstairs, walk behind them. If they begin to fall they can be pulled toward your thigh.
Do not walk on the stairs with an unreliable, unsteady, tottering client, or one who cannot totally support their weight.
Assisting a Falling Client
A client can lose balance at any time during a transfer, while walking, or during a simple change of position. Follow these guidelines to protect both the client and yourself from injury during a fall:
- Keep your back straight, feet apart and knees flexible. Stay close to the client, giving firm, steady support.
- If possible, ease the client down the side of your body and down your leg to the floor. Be sure to protect their head.
- Maintain a calm attitude. Reassure the client that you will remain with them.
- Once your client is on the floor, allow them to move into a comfortable position and rest briefly. Check them for injuries; ask about pain.
- Do not attempt to move an injured client.
- If the client appears to be injured, follow the agency guidelines for emergency procedures.
- Cover client with a light blanket or sheet while waiting for help to arrive.
- If the client does not seem to be injured, follow the guidelines for “Assisting a Fallen Client Up from the Floor”.
Assisting a Fallen Client Get Up from the Floor
If a client falls or slides out of a chair, but is alert, uninjured, and able to follow directions, use these guidelines:
- Do not attempt to pull or lift the client up from the floor.
Verbally direct the client to roll over onto their side and then onto their hands and knees.
- Place a chair in front of them and hold it firmly.
(A wheelchair with locked wheels will work as well).
- Instruct the client to use the seat of the chair to pull themselves up to a kneeling position and then to a standing position.
- Use the transfer belt to help guide the client to their feet from the kneeling position.
- Have a chair at a right angle to the first chair, ready to seat the client after rising.
- If the client is unable to help themselves out of their situation, call for help. Follow agency procedures or your supervisor’s instructions.
Helping a Client Walk with a Cane or Walker.
Using a Cane:
- The client should hold the cane on their strong side.
- Client should take the first step with the strong leg.
- Move the cane and the weak leg at the same time for the next step.
- “Strong, Weak + Cane”
Using a Walker:
- Have the client hold both handgrips of the walker.
- The client should pick up the walker rather than pushing it.
- The client’s first step should be with the weak leg.
- The second step should be with the strong leg.
- “Walker, Weak, Strong”
- The client should remain inside the walker, not lean over it or push it too far ahead.
Helping with a Device:
- Encourage the client to look up when walking with a cane or walker.
- Apply the transfer belt, if directed.
- Stand on the weaker side and a little behind the client.
- Keep one arm ready by the client’s waist.
- Keep your other arm by the client’s upper arm. It should be closest to you – or grasp the back of the transfer belt.
Rising from a Wheelchair with a Walker or Cane:
- Have the client sit on the edge of the chair and hold onto the armrests.
- Lean the cane or walker against the chair.
- The client should lean slightly forward and push themselves up, using the armrests.
- The client should not hold onto the walker for support while rising from a chair because it may cause them to fall.
- Once standing, the client can start using the cane or walker.
Sitting with a Walker or Cane:
- Have client stand with back to chair, legs touching edge of seat.
- Have client reach behind themselves and hold the armrests.
- Client should lean forward slightly and lower themselves to the chair by bending their legs.
- Once seated, the client can slide back into a comfortable position.
Climbing Upstairs with a Cane:
- Have the client take the first step with the strong leg.
- Next, move cane and weaker leg at the same time to go up the step.
- “Strong, weak, cane”
Going Down Stairs with a Cane:
- Have the client take the first step with the weak leg and cane together.
- The second step should be with the strong leg.
- “Weak, Cane. Strong.”
Using a Wheelchair
Using a Wheelchair to Transport a Client
- Place the wheelchair at a right-angle to the client.
- Lock the wheels of the wheelchair and raise or remove the footrests.
- Transfer the client to the wheelchair.
- Use the transfer belt if necessary.
- Assist the client into a safe and comfortable sitting position.
- Stand behind the client with one foot forward, knees bent.
- Brace one knee against the back of the chair.
- Have the client fold their arms across their chest.
- Reach under client’s am1s. Grip crossed forearms with your hands.
- Pull client toward you and the back of the wheelchair so their buttocks are on the back of seat.
- Position the client in good alignment with their feet on the footrests of the chair.
- Pull by stepping back and using your body weight to assist in sliding the patient back. (Do not pull with your arms only.)
- Position the client so there is no possibility the client will slide or fall forward from the seat.
- Cover the client with a light blanket if desired.
- Position the client’s feet on the footrests.
- Unlock the brakes.
- Guide the chair from behind following these basic precautions:
- a) Back down slanted ramps.
- b) Back into and out of doorways after carefully checking for clearance.
- c) Always put the brakes on when the wheelchair is stopped.
Guidelines for Wheelchair Transport – One Step:
- Secure patient in chair with safety strap and sheet ties around patient, etc.
- If patient has poor sitting balance, this step is absolutely necessary:
- The patient should always face uphill, regardless of what direction you’re moving, either up or down the steps.
Going Down a Step with an Unreliable Client:
- Tilt the chair onto its rear wheels.
- Check the client’s feet to be sure they are on the footrests.
- Elevate the footrests if possible.
- You step down, off step.
- Keep the chair balanced against your thighs.
- Maintain the center of gravity for the chair and within (or near) your center of gravity.
- Slowly roll the chair down and off the step, backward (downhill), until both rear wheels are on the ground.
- With chair still balanced on its rear wheels, back up far enough to allow the front wheels to lower to ground.
- Slowly continue backing up until the chair rests evenly.
Going Up a Step:
- Have the patient face uphill.
- Stand behind the chair.
- Tilt the chair back onto the rear wheels (Push on pegs behind rear wheels. – Use your body weight.)
- If patient is heavy, keep front wheels in the air.
- Balance the back of the chair against your thighs until the front wheels clear the step.
- Lower the front wheels onto the upper level.
- Bend your knees, put your hands below the chair grips and push the chair up onto the upper level.
- Use your body weight to push and roll chair up over the step.
- Do not lift the rear wheels onto the step.
- For light patients, you may be able to lift, but if in doubt, do not try to lift.
Going Down: (Reliable Light-Weight Patient)
- Face the wheelchair toward the stair.
- Tilt the wheelchair back onto its rear wheels. Keep the chair snug against your body
- Do not allow the chair to move out from you. Do not let go of the handles.
- With chair balanced on rear wheels, slowly push chair forward, off the step.
- Be sure you have co11trol of the chair.
- Keep the back of the chair tilted against your thighs.
- Once the wheels are over the edge of the step, lower rear wheels to ground
- Then slowly lower front wheels to ground.
- Proceed forward.
- If you feel unable to control the patient or the chair, use the face-first, back down method.
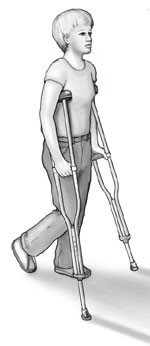
Using Crutches
- Wash your hands.
- Explain to the care recipient what you are going to do.
- Make sure care recipient is appropriately dressed.
- Apply a transfer belt and help the care recipient to stand.
- Care recipient grasps the crutches. There should be a two-finger width between the armpit and crutch arm. Their arm is slightly bent and crutches held 6 – 8” away from the heel.
- Swing Through Gait – no weight bearing on one leg. a. Place crutches 6 – 12” ahead b. Lift and swing body slightly ahead of crutches c. Bring crutches in front of body and repeat.
- Four Point Gait – can bear weight on both legs.
– Move right crutch forward 6 – 8”;
– Move left foot forward;
– Move left crutch forward;
– Move right foot forward;
– Repeat.
- Going Down Steps a. Put crutches down on step first b. Bring strong leg down, then weak leg c. Repeat until at bottom of steps.
- Going Up Steps a. Crutches and legs on same step b. Move up strong leg and put weight on it c. Move up crutches and weak leg d. Repeat until at top of stairs.
- Wash your hands when completed with procedure.