6.2. Needs of the fragile, ill and physically disabled in the community setting with special training and staffing considerations. Part #2
-
Toileting.
A care recipient may need assistance with toileting. If they can’t use the toilet in the bathroom, the family caregiver will need to help with the use of a bedpan or a commode. You may have to help the care recipient who can use the toilet, but is unable to do it alone. A bedpan is used when the care recipient cannot get out of bed. Sometimes, it is used only at night, when it is more difficult to get to the regular toilet. Women use the bedpan for urination and bowel movements, while men use the bedpan usually for a bowel movement only. Bedpans are made of plastic or stainless steel. A stainless-steel bedpan should be lightly warmed before use, by running warm water over it. The bedpan is cleaned after each use and is stored covered. The bedpan should be cleaned immediately after it is used. This will prevent the spread of microorganisms, the development of odors, and possible spilling of the contents. Clean by emptying the contents in the toilet, rinsing in cold water, and wiping both the inside and outside with disinfectant. When the care recipient can get out of bed, but is still unable to get to the regular toilet, a bedside commode may be used. A bedside commode is a portable chair with an open center for voiding. The collection holder may be a bedpan or pail that needs to be emptied and cleaned after use, as the bedpan is. Good hygiene following toileting is very important in the prevention of urinary tract infections. Remember to always wipe the genital area from front to back and change the location on the washcloth with each wipe. Use soap and water or pre-moistened wipes.
When assisting the care recipient with toileting, follow these general rules:
- Help them with a toileting as soon as requested.
- Have the care recipient assume a normal voiding position of sitting upright whenever possible. 3. Make sure the bedpan is warm.
- Always ensure the care recipient’s privacy.
- Make sure the care recipient is covered for warmth.
- If the care recipient is weak, provide assistance.
- When a care recipient is strong enough to be alone, leave for 5 minutes to use the bedpan, commode, or toilet.
- Always make sure toilet paper is within easy reach for the care recipient.
- Provide perineal care as needed.
- Allow the care recipient to wash his/her hands and genital area after using the bedpan, commode, or toilet. Assist when necessary.
- Offer the opportunity for toileting regularly, as the care recipient may not ask.
Confused, frail, or unsteady clients may need to be helped to the bathroom regularly to avoid toileting accidents and injuries from falls.
- Follow the procedure for transfers, if necessary.
- Assist the client to loosen and remove clothing before being lowered onto the toilet.
- Provide toilet tissue. Provide privacy, if possible. Leave the client alone only if safe.
- Leave the bathroom door unlocked and stay close to the door so you are available to assist if needed.
- After using the toilet the client may need help to clean the genital area:
- WEAR GLOVES. Wipe from the front to the back; from cleanest to most soiled area.
- Remove gloves and wash hands.
- Assist the client to re-dress as necessary.
- Encourage the client to wash hands after using the toilet.
Assisting with a Commode
A commode is used for clients who are able to get out of bed but not able to walk to the bathroom. It is a chair with a toilet seat positioned over a removable container and is often left at the bedside. Some commodes have wheels, which should be locked for the safety of the client.
The commode should be emptied and washed out after each use to avoid the spread of infection and to reduce odors. Toilet tissue and hand washing supplies should be kept next to the commode. (Follow the above guidelines to assist the client in using the commode).
Cleaning the commode
WEAR GLOVES
- Remove the container from the commode and empty contents into the toilet. Avoid splashing.
- Swish a mixture of household disinfectant (Lysol or bleach) and water. Use a toilet brush if necessary.
- Rinse with clear water and dry the outside with paper towels.
- Replace the container.
- Remove gloves and wash hands thoroughly.
Assisting with the Urinal
Urinals are used by men for urination. They are jug-like containers with handles that allow them to be hooked onto the sides of beds or chairs. The urinal can be used with the man standing, sitting, or lying down. The more normal position for male urination is standing; attempt to help the client to stand if possible.
Procedure:
- Wash hands and gather equipment: Urinal, disposable gloves, washcloth, and towel (perhaps basin, soap, and water).
- Ask the client which position he will use.
- Assist him to stand or sit at the edge of the bed, as necessary.
- Offer the urinal to him. (If necessary, put on gloves and assist him to place his penis into the urinal).
- Provide privacy for the client.
- Ask him to call when he is finished or if he needs help.
- Step away or out of the room if he can be left alone briefly. (Remove gloves, wash hands).
- Return to the bedside when he finishes urinating. Put on gloves.
- Receive the urinal from the client. Offer him the washcloth and towel and encourage him to wash his hands.
- Empty the urinal into the toilet. Rinse and disinfect the urinal (using bleach solution, Lysol or another household disinfectant).
- Return the clean urinal to the bedside.
- Clean up the area and put away supplies.
- Remove and discard gloves.
- Wash hands thoroughly.
Assisting with a Bedpan
The client who is confined to bed will need assistance using the bedpan for bowel movements. Female clients will also need to use the bedpan for urinary elimination. As with all personal care procedures, encourage the clients to do for themselves as much as possible. Bedpans are available in different sizes and shapes. Some are made of stainless steel, some are plastic. The traditional bedpan is usually used for larger adult clients. The “fracture pan” is smaller and flatter, often used with children and thin adults.
Procedure for use of the bedpan:
- Assemble equipment and supplies:
- Bedpan
- Toilet tissue
- Bed protector (newspaper, towel, plastic trash bag)
- Disposable gloves
- Moist washcloth or disposable wipette
- Wash hands and put on gloves.
- If using a metal bedpan, warm it with warm water before offering it to the client.
- Line the bedpan with toilet tissue if the client is having a bowel movement. This will make cleaning easier.
- Apply a small amount of lotion or talcum powder to the edge of the bedpan that will come in contact with the client’s skin. This will prevent the skin from “sticking” to the pan.
- Have the client remove clothing from the lower body. Help with undressing as necessary. Provide privacy by covering the client with a sheet or towel.
- Have the client lie on their back, knees bent, feet flat on the bed, and raise her hips on the count of three. Work together to save energy.
- Quickly place the bed protector on the bed and slide the pan under the client’s hips. Have client lower their hips once the pan in its place. OR if the client is unable to lift their hips, have the client roll onto their side – away from you. While they are on their side, position the bedpan on their bottom and help them to roll back onto it while you hold it in place.
- Use pillows to prop the client into a sitting position, if possible. (Sitting is a more natural position than lying down for elimination). A weaker client may need your assistance to hold her up in a sitting position. Ask the client about the position of the bedpan; it may need to be adjusted for comfort.
- Adjust the bed linens to provide privacy.
- Leave the toilet tissue within reach.
- If the client is strong and reliable enough to be left alone, step out of the room, but stay close by.
- Instruct the client to call for you when they are finished with the bedpan.
- Leave the room, unless the client can’t be left alone.
- Remove gloves and wash hands.
- Wait a few minutes until client has finished, then knock and re enter the room.
- Put on disposable gloves. Place a chair next to the bed. Prepare a warm, wet washcloth and towel and bring them to the bedside.
- Have the client roll away from you or lift their hips as before and carefully slide the bedpan out and place it on the bedside chair.
- Clean the genital area if the client cannot do so. Clean from front to back using toilet tissue. Provide peri-care if necessary. Use a second washcloth and towel. (See the “Complete Bed Bath” section)
- Offer a clean washcloth and towel and encourage the client to wash their hands.
- Take the bedpan to the bathroom and pour the contents into the toilet. Avoid splashing.
- Rinse and then clean the bedpan with disinfectant and a toilet brush if necessary.
- Rinse again and return to its usual place.
- Cover the clean bedpan with plastic or a paper towel.
- Remove and discard gloves. Clean up the area.
- Help the client get dressed if necessary.
- Wash hands thoroughly.
Emptying the Catheter Bag
The PCW/P may need to assist a client with emptying the catheter bag. The catheter is a tube that leads into the client’s bladder and drains urine away from the body to a collection bag. The catheter needs to be handled very carefully to avoid introducing germs to the client and causing a bladder infection. The PCWIPshould not disconnect the tubing between the client and the bag.
( This is a task done only by persons with special training: CNA’s and supervisors.)
Procedure for emptying the catheter bag:
- Explain what you will be doing, if necessary.
- Gather supplies:
- Disposable gloves;
- Container for collecting the urine;
- Newspaper or other disposable items to protect the floor or bed from spillage;
- Alcohol wipe or disposable wipe (or paper towel, with soap or disinfectant)Wash hands. Put on gloves.
- Spread newspaper under the collection bag.
- Locate the clamped hose at the bottom of the collection bag.
- Clean the end of the hose with a disposable wipe.
- Open the drain and allow the urine to drain into the container.
- Be sure that the end of the drain does not touch the container or any other surface. (This could cause contamination of the tubing and create an infection for the client).
Procedure for Cleaning Used Bag:
This procedure is to be followed only if the client, a family member, or the supervisor has removed the collection bag from the catheter system.
(The PCW/P should not disconnect the tubing between the catheter and the BAG.)
- Wash hands and put on gloves.
- Empty urine from bag.
- Rinse out urine, allowing water from tap to flow freely through bag.
- Wash with hot, soapy water, using an irrigation syringe.
- Rinse thoroughly with clear water.
- Fill inside of bag with bleach solution (one ounce of bleach to one quart of water, made fresh daily).
- Immerse bag in bleach solution (in basin or sink) for 20 minutes to disinfect both outside and inside of bag.
- Open lower drain and empty bag.
- Close the bottom drain of bag and tuck the drain tube into its pocket.
- Fill the bag with air, using an irrigation syringe.
- Cap the upper opening and allow bag to dry in a clean place.
- If no tubing cap is available, cover end of tubing with a clean piece of plastic or clean gauze.
- Clean and disinfect all equipment. Use hot soapy water and a bleach solution.
- Dispose of waste, using Standard Precautions.
- Remove and discard gloves and wash hands thoroughly.
- Once dry, the clean bag and tubing should be stored in a clean plastic bag or covered with a clean towel, ready for re-use.
-
Applying Elastic Stockings, Assisting with a Hearing Aid.
Applying Elastic Stockings
Some clients need to wear support stockings because of circulatory problems. The elasticity helps to stimulate blood flow and prevent swelling of the feet, ankles, and legs. The elastic stockings should be applied in the morning and removed at bedtime.
(NOTE: If these are “prescription” stockings, they are not to be applied by the PCW. The PCW can apply only those that can be purchased over the counter).
Ideally, elastic stockings are applied before the client gets out of bed, before swelling can occur. Check the care plan for each client’s specific routine.
Procedure:
- Explain the procedure to the client.
- Wash your hands.
- Position the client on their back or seated in a chair with feet elevated on a footstool.
- Hold the foot and heel of the stocking. Gather the rest of the stocking in your hands.
- Support the client’s foot at the heel.
- Slip the foot of the stocking over the toes, foot, and heel.
- Pull the stocking up over the leg. It should be even and snug, without wrinkles.
- Repeat these steps for the other leg.
- Wash your hands.
Some elastic stockings are open-toed. Others have a small circular opening, which will be at the base of the client’s toes. To remove the stockings, grasp them at the top edge and slowly peel them down the leg and off the foot, turning them inside out.
To launder, wash in warm soapy water by hand and rinse well; or use the delicate cycle of the washing machine. Hang to dry.
Assisting with a Hearing Aid
Hearing aids are used by some clients to amplify sound. They do not correct physical hearing problems or make speech clearer. They amplify both speech and background noises, so the person with a hearing aid may not want to use it in situations where there are many people or a great deal of background noise.
Hearing aids are made of molded plastic and are battery-operated. They have on/off switches and volume controls. Occasionally, hearing aids will malfunction.
Several factors may contribute to the problem and need to be checked:
- The battery may need to be replaced or re-positioned;
- The earpiece may need to be cleaned;
- The switch could be off or the hearing aide could need repair.
- Hearing aids are expensive and need to be handled carefully. They are tiny and easily misplaced.
- Always ask the client about their routine hearing aid storage place and follow the established routine.
- Assist with regular cleaning but do not immerse it in water. Use a damp cloth and mild soap.
- Follow the tips for communicating with the hearing-impaired, Section I.
Procedure for Hearing Aid Placement
- Wash your hands.
- Check the appliance to see that it is clean and in working order.
- After testing, turn it off or to the lowest volume setting.
- Hand the appliance to the client for insertion, OR Grasp the device and gently insert the tapered end into the ear canal.
- Gently twist the ear mold into the curve of the ear, slightly pulling the earlobe downward and outward with your other hand.
- Have the client turn on the hearing aid and adjust the volume.
- Wash your hands.
-
Caring For Incontinence.
If the care recipient does not have control of bowel and bladder functions, the family caregiver will need to assist with changing and cleaning. It is important to provide this help in such a way as to preserve the loved one’s dignity as much as possible. Requiring this kind of help will probably be embarrassing to the care recipient. You can do much to alleviate those feelings. Incontinence is defined as the lack of ability to control the bladder and/or bowels. There are a number of things that can cause such a condition, including: physical disorders, medications, immobility, distance and difficulty getting to the toilet, stress, amount and type of fluid and food intake, and changes due to aging itself. Check the care recipient often to see if changing is needed. Every two hours is the common practice. Follow the procedure for the proper technique of changing and cleaning the care recipient. It is important to use the correct techniques to help control odors and maintain good skin condition. When changing pads or briefs, observe the care recipient’s skin condition. Report significant changes to the physician. Apply powder or lotion as directed. NEVER show anger or disapproval when the care recipient wets or soils. Be matter-of-fact and show respect towards the care recipient. NEVER refer to the incontinence pad or brief as a ‘diaper.’ You can help care recipients feel better about themselves by handling the situation properly.
Incontinence Care
- Assemble necessary supplies
- Pad or brief;
- Wash cloth;
- Powder or lotion;
- Gloves.
- Provide for privacy.
- Wash your hands and put on gloves.
- Use correct positioning techniques when moving care recipient.
- Remove soiled pad, brief, or clothing.
- Clean and dry area. With peri cares, you always cleanse from front to back and turn washcloth with each wipe.
- Remove gloves.
- Observe for unusual skin conditions.
- Apply appropriate lotions/powder, if necessary.
- Apply clean pad or brief, and clothing.
- Properly dispose of soiled items and other supplies.
- Wash your hands.
- Assemble necessary supplies
-
Treating Bowel And Bladder Problems.
Bladder and bowel problems need special attention.
It is important to observe urine and feces for frequency, amount, color, and odor. Check whether urine is cloudy or clear, and observe the texture of feces. Report any problems or complaints.
Urine is normally pale yellow and clear. Darker yellow usually indicates the need for more fluid. If you notice anything abnormal (e.g., color, odor, blood), report it.
Bowel movements (BM) eliminate bodily waste (feces) through the anus. Frequency of bowel movements varies from person to person and is affected by age, disease, medications, diet, fluids, and activity. The general range is three times a day to three times a week. The NA must document each BM and recognize problems related to elimination. Any abnormal urine or feces should be reported before it is discarded. Report any complaints of pain or burning during elimination.
Constipation is bowel movements that are infrequent and painful with hard feces. Treatment includes.
Adjusting the diet, increasing fluids, and adding physical activity. If these measures are not effective, a suppository or enema may be ordered.
Impaction is a serious form of constipation with inability to pass fecal matter. The resident may complain of pain in the abdomen or rectum. There may be an absence of bowel movements for several days, and small amounts of liquid may be seeping from the anus. Report any symptoms of impaction immediately.
Diarrhea is watery stool. Causes include food irritations, medications, and infections. The urge to eliminate may happen suddenly. Keep a call light/ signal within easy reach of the resident, and respond promptly. Pay extra attention to hygiene, and encourage fluid intake to replace loss of fluids.
Watch for anything unusual and any problems related to elimination. Report any concerns immediately. Elimination problems include the following:
Symptom Problem loose feces Diarrhea dark or ”tar” feces Possible internal bleeding hard feces Constipation small, infrequent feces Possible impaction dark or cloudy urine Possible urinary tract infection pain or burning on urination Possible infection small, frequent amounts or urine Possible infection Bowel and Bladder Training
Some clients lose bowel and bladder control. This condition is called incontinence. Causes include age, disease, immobility, physical restraints, and confusion. Training programs help clients regain control of elimination. Follow instructions carefully for clients who have training plans. Relearning bowel and bladder control takes time and patience.
The goal of training is to establish regular patterns for elimination and to minimize or eliminate incontinence. Individual schedules are established. In order for training to be successful, instructions must be followed exactly. If training begins in the early stages of incontinence, the client may improve within six weeks. Others may take a year or more.
All clients need to be offered frequent toileting. Some clients have “accidents” because they are embarrassed to ask for help with elimination needs. Failing to toilet clients who are continent is a form of abuse (forced incontinence). Not providing pericare after clients soil themselves is also abuse. Always be supportive and sensitive to the clients’ toileting needs.
Some clients wear special briefs for incontinence. Learn to apply the briefs correctly. Improper use can cause skin problems. Change briefs whenever they are wet or soiled, and clean the skin thoroughly. Discard briefs according to procedures at the facility where you work.
Observe what is happening when incontinence occurs. Sometimes incontinence increases with despair, excitement, anxiety, or isolation; residents are seldom incontinent at social events. Encourage social activities that are useful and interesting, and promote social interaction.
Bladder Retraining
Keep accurate records of fluid intake, and record the time when the resident voids or wets. Provide toileting according to the individual ‘s retraining schedule. Encourage adequate fluid intake. Unless the care plan states otherwise, provide fluids with meals and between meals. Cutting back on fluid does not decrease incontinence and may cause serious health problems.
Assist with proper positioning. Males void more easily standing, and females void more easily sitting with feet firmly on the floor.
Bowel Retraining
The goal of bowel retraining is to gain control of bowel movements and develop a pattern of elimination. Explain the training program to the resident and encourage cooperation.
Follow each client’s care plan carefully. If allowed, teach exercises that strengthen abdominal muscles. Provide a regular eating schedule, and study eating habits. For residents who are able, encourage ambulation and physical activities.
Find out whether there has been a change in diet, fluid intake, or physical activity. Ask how often and what time of day bowel movements occurred previously.
Explain that every body system depends on water in order to function. Offer water and beverages through out the day (unless the care plan states otherwise). Establish a toileting schedule. Bowel evacuation often occurs about a half hour after breakfast. Be sure the resident has easy access to the toilet, or offer bedpans and assistance frequently. Provide privacy, allow sufficient time for toileting, and do whatever is necessary to ensure the resident’s comfort and safety.
-
Temperature And Pulse, Feeding The Client, Eye Care, Self-Administering Medications, Prosthesis/Orthotics.
TEMPERATURE AND PULSE
A PCWIP will rarely need to take the temperature or pulse of the client. However, these instructions will be helpful if the supervisor or supervisor requests that you obtain these readings on your client.
Temperature Procedure:
- Wash your hands.
- Have the client sit or lie down.
- Gather equipment: thermometer, plastic probe cover, paper towel, soap and water, or alcohol wipe for cleaning.
- Evaluate the safety of this procedure for this client:
a) Can the client hold the thermometer in their mouth? lf they cannot hold the thermometer without close supervision or assistance, do not take the temperature by mouth.
b) Report your safety concerns to the person who requested the temperature reading.
- Evaluate the circumstances for accuracy:
a) Did client have something hot or cold to drink, or smoke a cigarette within last 15-20 minutes?
b) Is the client using oxygen?
c) If any of the above is true, the oral temperature will not be accurate.
- Clean thermometer: Wipe with soap and water or an alcohol pad, from stem toward the probe end.
- Apply a disposable probe cover (especially if the thermometer is used by others).
- Press the on/off button to turn the unit on. (Depending on the model, it can be found either on the end of the thermometer or along the shaft as a raised button).
- Wait momentarily for the display test to flash on the window. It may read: “8888” or “98.6” or some other brief message.
- When the window has cleared, have the client place the thermometer probe tip under his tongue, to the left or right of center-tongue. The client should keep lips closed around the thermometer during measurement
- Keep the thermometer in place for about 60 seconds or until the beeper sounds.
- Remove the thermometer and discard the probe cover. .
- Read and record the number in the window of the thermometer. (Oral normal readings are between 97 and 99 degrees Fahrenheit. Anything else should be reported promptly to the supervisor).
- Push the on/off button. Discard the plastic probe cover.
- Clean the thermometer from stem to probe, as above.
- Place the thermometer into its case and put it away.
- Wash your hands.
Axillary or Rectal Temperature, as above except:
- Axillary-covered tip of thermometer is held in center of patient’s axilla for at least 9 minutes or until it beeps. Normal temperature is about 96 degrees.
- Rectal -Use gloves and Standard Precautions. Cover patient to protect privacy.
a) Client is side-lying with upper leg pulled toward chest;
b) Lubricate covered rectal thermometer or rectal electronic probe. Gently insert to a maximum of I inch into rectum.
c) Hold in place at least 3 minutes while supporting the client to prevent any movement that could cause injury.
d) Normal reading is about 99 degrees.
Counting the Radial Pulse
- The pulse rate is the number of heartbeats counted in one full minute.
- It is usually counted at the radial artery on the thumb side of the wrist.
- Normal adult pulse rates are in the range of 60 – 100 beats per minute. Any number less than 60 or more than 100 beats per minute should be reported promptly to the supervisor.
- Realize that the pulse rate could be affected by emotion such as anger, excitement, anxiety, exercise, infection, position, pain, and other factors.
- The pulse should be a regular and strong rhythm.
Procedure for Counting the Radial Pulse:
- Wash your hands and gather equipment: a watch or clock with a second hand.
- Explain what you will be doing.
- Position the client comfortably with his hand and arm supported on the bed, chair, or their lap.
- Ask them to remain silent and still for a full minute.
- Place the first three fingertips of your hand on the thumb side of the client’s wrist and locate the pulse.
- Watch the second hand of the clock and count the number of beats for one full minute.
- Record the number (beats per minute) on your observation record and/or the flow chart in the home folder. Call the office to report any unusual findings, like high or low readings or irregular rhythms.
- Wash your hands.
Feeding the Client
Clients may need to be fed for a variety of reasons: weakness, paralysis, visual impairment, and memory loss. Other disabilities may make self-feeding impossible.
Preserving the client’s dignity is important, as are safety factors and techniques:
- Explain to the client what you are going to do.
- Wash your hands and assist the client to wash their hands as needed.
- Seat the client comfortably.
- Prepare the food to be served and tell the client what kind of food is being served.
- Put a napkin on the client’s chest.
- If the client has difficulty swallowing, make sure the food is pureed, soft, or cut in small pieces. (Check care plan).
- Make sure the food is not too hot.
- Allow time for the client to chew and swallow.
- Use a straw for liquids if necessary. Be careful of the temperature of liquids.
- Converse with the client. B encouraging. Allow the client to be as independent as possible.
- If the client is confused, it may be helpful to hold one of their hands while feeding.
- Keep the client’s mouth and face clean.
- For feeding a blind client, describe the food you are offering and use the numbers on the clock to identify the location of the food on the plate.
EYE CARE
The care recipient may need your assistance in putting eye drops or ointment in the eyes. Helping with eye care is best when a certain routine has been established for the family caregiver’s assistance. The routine may include things such as the kind of solution, how many drops, and which eye it goes into, etc.
Instilling Eye Drops or Ointment:
- Assemble supplies
- Eye care product (drops, ointment);
- Gloves;
- Tissues or cotton balls.
- Wash your hands.
- Position the care recipient sitting down with head slightly back. (Can also lay on back with pillow under neck to extend head back.)
- Put on gloves.
- Pull down on lower lid and have the care recipient look upward.
- Hold dropper in dominant hand about ½” – ¾” from eye.
- Instill prescribed number of drops in lower lid. Do NOT touch lid with dropper.
- If the care recipient blinks or closes eye, repeat procedure.
- Have care recipient close eye for a short time.
- Wipe off any excess medication with tissue or cotton ball. Wipe from inner corner to outer corner of eye.
- Remove gloves and wash hands.
- Return supplies to proper place and dispose of garbage.
SELF-ADMINISTERING MEDICATIONS
- A PCW/P is not permitted or licensed to give medications to a client.
- Administering medications is the responsibility of the supervisor, client, or family.
There are two types of medications:
- Prescription drugs which require a doctor’s order
- Over the counter (OTC) drugs that can be bought without a Doctor’s order.
Procedure:
- Check and follow the care plan.
- Remind or ask the client if it is time to take medication – according to the care plan.
- Wash hands.
- Place the container that the client requests within reach.
- Assist with opening top if needed.
- Have spoon for liquid medication and/or water or juice available for client.
- Report to the supervisor and family if the client is confused about the medications
Medication boxes (Pre-poured)
Some clients have pre-poured medications. These drugs are measured into special containers (medication boxes) by the supervisor or family member. Each compartment is labeled for a certain day and time. For example on Friday morning, the client would take a medication from the compartment labeled Friday 9 a.m.
Medication set-ups help reduce error and are helpful for clients with poor vision or who have trouble remembering.
PCW/P’s do not administer prescription or OTC drugs. When a PCW/P reminds or assists a client with medications; this means the client is taking the responsibility. A PCW/P may take the container to the client at their request and open it if needed, but may not take the medication out of the container. A personal care worker may assist a client with medication reminding only when medications have been preselected by the client, a family member, a supervisor, or a pharmacist, and are stored in containers other than the prescription bottles, such as medication minders.
Medications should be properly labeled so you can see the dose and time it should be taken. You can remind the care recipient to take their medication. You can assist with opening and recapping the containers. Since a care recipient with arthritis may have trouble handling the medication bottle, you may put the medication into the cap or make it possible for them to retrieve and swallow the medication on their own. The family caregiver can assist with proper positioning to make sure the client will take the medications safely. The best position is for the care recipient to sit up as much as possible. You can assist the care recipient to drink the fluid needed to swallow the medications.
Observe your care recipient for any side effects from medications. If noticed, report the observations to the care recipient’s physician. Also, report if the care recipient is not taking the medication or is taking the wrong amount. Make sure that medications are stored properly. Some need to be refrigerated. Keep them out of reach of children. Your care recipient may have a medication planner that has an entire week of medications divided into each day of the week. You can make making sure the right day of the week is opened and taken.
Common side effects from medication include:
- Nausea and vomiting;
- Diarrhea & Rash or hives;
- Headache;
- Confusion or agitation.
PROSTHESIS/ORTHOTICS
The care recipient may have a prosthesis or orthotic device that he/she needs assistance with applying or removing. Knowing what they are and some information about their usage will help you in assisting the care recipient. A prosthesis is an artificial body part. Some examples are: arm, leg, breast, or eye. Prosthesis is usually used to promote the independence of the care recipient. An orthotic device is an orthopedic appliance or apparatus used to support, align, prevent, or correct deformities or to improve function of movable parts of the body. A more common word for this device is a brace. The prosthesis and the orthotic device need to be applied correctly to function properly. The care recipient will often have a picture to show the proper application. Follow the recommended use–for example, wearing it for certain time frames, etc. Observe the condition of the skin daily. If the skin has red areas or open sores, the device may not be fitting well or is not being applied properly. The part of the body where the prosthesis or orthotic is applied will often have some type of covering over the skin to protect it. Report any unusual skin conditions to the care recipient’s physician. Check prosthesis or orthotic devices often for:
- Loose or worn parts
- Missing or loose screws
- General condition, especially the straps and/or Velcro
- Cleanliness
-
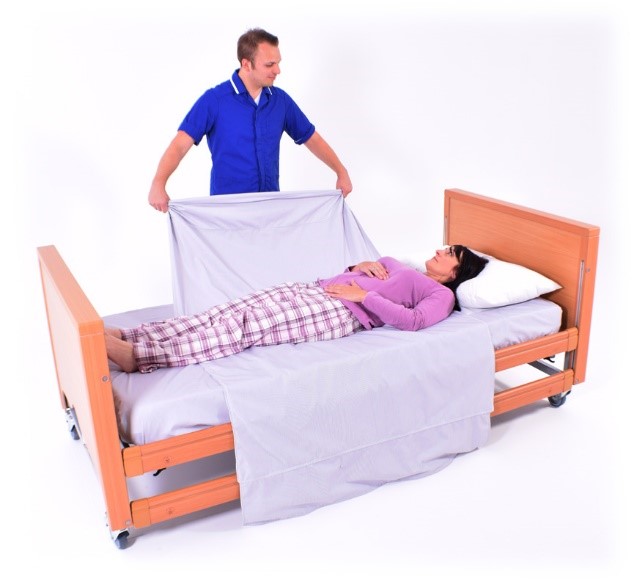
Bedmaking.
Your care recipient may spend part of or all of the day in bed. As a result, many individuals are fed, bathed, and use the bedpan in bed. Making a bed properly is, therefore, very important. A clean, neat bed will make the care recipient comfortable. Wrinkles are uncomfortable and restrict the circulation, and can cause pressure sores (decubitus ulcers). Make the bed wherever your care recipient has decided to sleep, whether in bed or on the couch. Use whatever linens are in the house.
There are three basic types of beds:
- Closed bed – used when the bed will be empty for a while. It will stay clean, not exposing the linens.
- Open bed – used when the care recipient is out of bed for a while but needs to get into it easily. The top sheet of the closed bed is fan-folded down.
- Occupied bed – used when the bed is made with the care recipient in it and not able or permitted to get out of the bed.
Tips for bed making:
- Keep the bed dry and clean. Change linens when needed.
- Keep the bed wrinkle-free.
- Keep the bed free of food and crumbs.
- Make the bed to suit your care recipient.
Following are some general rules to help you with bed making:
- Never use torn or pinned linens.
- Never shake linens, as this spreads microorganisms.
- Never allow linens to touch your clothing.
- Never put dirty linen on the floor.
- When using a flat bottom sheet instead of a fitted sheet, always miter the corners. These make the bed smooth, wrinkle-free, and give the bed an attractive appearance.
- Fan-folding the top of the bed enables the care recipient to easily get in and out.
- A plastic ‘draw sheet’ protects the mattress. If you don’t have one, a plastic tablecloth makes a good substitute.
- Plastic must never touch the care recipient’s skin. You must always cover the plastic draw sheet with one of cotton. (This is about half the size of a regular sheet and can be made by folding it in half width-ways. Place the fold towards the top of the bed.)
- When the care recipient is in bed all day, change the linen daily, or as often as necessary.
- Always use good body mechanics. Where there is a hospital bed, raise the bed to a good working height and lower it when done.
Making a Closed Bed
- Collect the linens needed
- Bottom Sheet;
- Top sheet;
- Draw sheet;
- Blanket;
- Bedspread;
- Pillowcase
- Remove soiled linens and place in laundry.
- Wash your hands.
- Fold bottom sheet length-wise. Centerfold should be in center of mattress.
- Open sheet. Should hang evenly over bed.
- Tuck the sheet under at the head of the bed.
- To miter the corner, pick up the edge of the sheet about 12” from the head of the bed and bring it to the top of the bed. Making a triangle. Tuck the bottom of the triangle (edge) under the mattress. Bring the top of the triangle down over the mattress and tuck it under.
- Tuck in the sheet all the way to the foot of the bed.
- Repeat the procedure on the opposite side of the bed.
- Place the draw sheet, if used, about 14” from the top of the bed and tuck tightly under the mattress.
- Place the top sheet on the bed, hanging evenly on both sides. Large hem should be even with the head of the bed.
- Place blanket and bedspread on bed, hanging evenly on both sides, and about 4” below the top sheet.
- Fold top sheet, blanket, and bedspread under at the foot of bed.
- Miter both corners, but leaving the top triangle hanging free.
- Fold the top sheet back over the bedspread and blanket.
- Place the pillowcase on the pillow.
Making an Open Bed
- Collect linens (same as for closed bed).
- Wash your hands.
- Make a closed bed.
- Fold the top of the covers (top sheet, blanket, spread) to the foot of the bed.
- Smooth the sides into the folds you have made.
- Place the pillow on the bed.
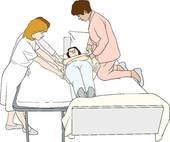
Making an Occupied Bed
- Collect the necessary linen
- Bottom sheet;
- Draw sheet;
- Top sheet;
- Blanket;
- Bedspread;
- Pillow case;
- Bath Towel.
- Wash your hands.
- Explain to the care recipient what you are going to do.
- Cover the care recipient with the bath towel and remove the top covers. Place linens in hamper.
- Remember to use the safety or bed rails if the bed has them.
- Ask, or help, the care recipient to move to one side of the bed or to turn onto side.
- Untuck the bottom sheet and the draw sheet and fold them towards the care recipient, against the back.
- Fold a clean bottom sheet in half, lengthwise. Place it on the bed, with the fold in the middle.
- Roll the top part of the sheet towards the care recipient. (This part will be used on the other half of the bed.)
- Tuck in the other half of the bottom sheet at the top of the bed. Miter the corner.
Tuck in the bottom sheet along the side.
-
Providing Physical Comfort.
Help clients to be as comfortable as possible.
It is important for everyone to meet their personal need for rest. Without enough rest, health problems are likely to develop. Inability to rest may be due to physical, psychological, social, and environmental factors. Observe each client’s physical and mental condition, and report any areas of concern.
Promoting Rest
Provide conditions that are suitable for rest. Use appropriate behavior, movements, and tone of voice to encourage relaxation.
- Talk to the client and ask what help is needed.
- Adjust light, noise, heat, and ventilation as much as possible
- Assist the client into a comfortable position, which is consistent with the plan of care.
- Help the client carry out any required pre-rest routines or activities.
- If monitoring the client’s rest is part of the care plan, keep accurate records.
Seek advice from an appropriate person if you have any difficulties with promoting rest.
Minimizing Discomfort and Pain
Everyone experiences pain or discomfort at times, but the ability to cope is different for each person. Individual beliefs and cultural background often affect the way a person deals with pain or discomfort (e.g., medication, yoga, massage, herbal remedies).
Prevent discomfort or pain as much as possible. clients should never have to suffer any longer than necessary. Encourage clients in your care to use self-help methods if they are able. Whatever method is used must be in accordance with the care plan.
Follow these guidelines to help minimize pain.
- Encourage clients to express feelings of discomfort or pain, and report any complaints to the supervisor.
- If monitoring pain or discomfort is part of the care plan, keep accurate records.
- Position the client for comfort.
- Explain the methods that are available for controlling discomfort.
Seek advice from an appropriate person if you have any problems dealing with discomfort or pain.
Insomnia
Insomnia is a disorder of initiating and maintaining sleep. Sleep is an important process to remedy “wear and tear” during the waking hours. Before there is any attempt to treat insomnia, a thorough assessment of the causes is essential.
Following are factors that can affect sleep:
- Illness, coughing, or pain;
- Worry or tension;
- Sleep environment (e.g., comfort, temperature, lighting, noise level);
- Hunger or stimulation (e.g., caffeine);
- The need to use the toilet;
- Interrupted pre-sleep routine.
Following are suggestions (if permitted) to promote sleep.
- Sleep-compatible bedtime routine (e.g., a hot milky beverage);
- Decaffeinated coffee or tea;
- Not having naps during the day;
- Relaxation techniques
- As a last resort, the doctor may prescribe medication to induce sleep.
Back Rubs
Back rubs help relieve tension and increase circulation. Because aging skin is fragile, back rubs may not be allowed. Follow the policies of the facility where you work.
Always check the care plan before you give a back rub. Restrictions may apply to clients with back injuries, skin problems, and certain heart or lung disorders.
Guidelines for giving back rubs include keeping your fingernails short to prevent scratching and using lotion to prevent friction. Before you begin, warm the lotion in a basin of warm water, and be sure your hands are warm.
Reporting and documentation responsibilities
- Completion;
- Observations;
- Client tolerance, response or problems with personal care.
-
Care for Individuals with Mobility Needs.
Limited Mobility, Bedrest
Effects of Limited mobility.
Limited Mobility Definition Mobility impairment may be caused by a number of factors, such as disease, an accident, or a congenital disorder and may be the result from neuro-muscular and orthopedic impairments. It may include conditions such as spinal cord injury, paralysis, muscular dystrophy and cerebral palsy. It may be combined with other problems as well (i.e. brain injury, learning disability, hearing or visual impairment).
Symptoms Mobility impairment covers a wide range of impairment, from clients who can move quite freely with minimal assistance, to ones who rely on a motorized wheelchair. In some conditions the person may experience pain, spasticity (continuous muscle contraction), or lack of coordination. In other conditions there are intermittent flare-ups and periods of remission, where the client seems to have no impairment of function (i.e. multiple sclerosis). Some clients who use wheelchairs are able to stand, but not walk. Some may walk with the use of an aid (canes, braces, and walker). The use of an aid may increase fatigue.
- Complications of Bedrest.
Bed rest is a medical treatment in which a person lies in bed for most of some period of time to gain health benefits. Prolonged bed rest has long been known to have deleterious physiological effects, such as muscle atrophy and other forms of deconditioning such as arterial constriction. Besides lack of physical exercise it was shown that another important factor is that the hydrostatic pressure (caused by gravity) acts anomalously, resulting in altered distribution of body fluids. In other words, when getting up, this can cause an orthostatic hypertensive, potentially inducing a Vasovagal response. Even physical exercise in bed fails to address certain adverse effects.
It is also a major cause of thrombosis, mainly by reducing blood flow in the legs.
Tasks that may be performed by the personal care worker that prevent complications.
- Movement;
- Positioning;
- Alignment;
- Range of motion;
- Restorative care & rehabilitation.
Care for Individuals with Mobility Needs
Introduction:

It is important for direct care staff persons to follow infection control procedures to prevent illness. Of equal importance is taking steps to assist a client to be as mobile as possible. Mobility gives people the opportunity to socialize, be active and independent. If mobility becomes limited, a person’s opportunities shrink and choices are reduced. Serious complications can result from long periods of limited mobility.
While the thought of being less active may sound very soothing, it can lead to many complications that can cause problems in almost every major body system. Immobility can have the following effects:
- Difficulty breathing and in the ability to expand one’s lungs. This can result in fluid buildup in the lungs, which increases the risk of pneumonia and lung infections.
- The heart works harder to pump blood through a body laying flat. Possible problems with blood circulation are swelling, blood pooling in the legs, decreases in blood pressure and increased risk of blood clots.
- Pressure sores develop quickly because the oxygen supply is reduced and pressure is increased.
- Muscles weaken and deteriorate from lack of use.
- Osteoporosis, fractures, slowed healing and other complications result because calcium is reduced in unexercised bones.
- If a person is in a flat position for a long time, urine does not fully drain out of the bladder and leftover urine in the bladder can become infected.
- There is a higher risk of choking and for developing indigestion or heartburn.
- A person’s appetite may decrease because they are less active or bored.
- Dehydration may become a problem as well.
- Mental health problems like depression become more common.
To help clients with mobility needs avoid these health risks, you can encourage them to be as active as possible, letting them do tasks, no matter how small, that they are able to do safely.
TURNING AND POSITIONING
Care recipients who are bedridden must have their position changed often. Learn how to give proper support and how to align the body properly in order to help them maintain or recover the best possible state of health. For instance, any open skin will heal more quickly if pressure is reduced and air is allowed to circulate around it. The successful practice of body alignment means that all parts of the body are in their proper positions in relation to each other. For instance, the shoulders and the hips should be at the same height and angle. Care recipients can be positioned in many different ways, depending on their diagnosis, condition, and comfort. Remember that care recipients, might not stay in the correct position for a couple of hours even though they usually cannot move without help. Check their position often.
Some general guidelines of positioning include the following:
- Position and support only nonfunctional parts of the body, leaving the rest of the body to move freely so that blood can circulate. These may include: shoulder blades, hips, hands, arms/elbows, or legs. Do NOT place anything under the knees when lying on the back.
- Any swollen limb should be kept higher than the heart where possible so that gravity will help the extra fluid drain from the limb.
- Use of assistive devices when positioning a client:
- Trochanter rolls;
- Foot boards;
- Hand rolls;
- Bed cradles;
- Abdominal pillows;
- Abductor pillow;
- Pillows.
For example: a rolled up washcloth makes an excellent support for the hand. Different sizes of pillows or pieces of foam can be used to support other parts of the body.
The different body positions used for positioning clients.
- Side lying;
- Supine;
- Prone;
- Sim’s;
- High and low Fowler’s;
- Trendelenberg.
Sitting Up When care recipients are eating, watching television, visiting, reading, or if they have a heart or respiratory disorder, they will need to be positioned in bed sitting up. Good body alignment is very important. This involves keeping the spine straight and supporting the head with a small pillow. Place pillows elsewhere, such as under the hands, for further comfort. When care recipients do not have a hospital bed, raise them using an arm lock and then position pillows behind the back to the desired level.
Positioning on the Back Lying on the back is called the supine position. Align the care recipient’s body with the spine straight. Normally, all that is needed is a pillow under the head and, maybe, a rolled up washcloth for the hands. Be sure to loosen the top sheet and blanket to relieve pressure from the toes. If the care recipient has nonfunctional body parts, more support will be needed. Nonfunctional means those parts of the body that cannot move due to paralysis from a stroke, resulting in a ‘weak’ side. This side requires more support and may include putting the following on that ‘weak’ side: 1. Small, folded hand towel under the shoulder blade. 2. Folded bath towel under the hip. 3. Rolled washcloth in the hand. 4. Arm and elbow on pillow so they are higher than the heart. 5. Small pillow under the calf of the leg, with the heel hanging off the mattress edge. 6. Do NOT place anything under the knee.
Turning
Sometimes, to prevent complications from bed rest and to receive care, bedridden care recipients must be turned. The direction in which they are moved will depend on the specific circumstances and conditions.
Procedure for Turning and Positioning
- Wash your hands.
- Explain to the care recipient what you are going to do.
- Provide privacy.
- Raise the bed to a comfortable working height.
- Lower the head of the bed as flat as possible.
- Raise the side rail on the opposite side from where you are working.
- Move the care recipient to the side of the bed near you.
- Cross the care recipient’s arms over chest and nearest leg over the farthest leg.
- If turning away from you, stay on this side of the bed. If turning the care recipient toward you, move to the other side of the bed. Remember to pull side rail up.
- Use good body mechanics with your feet separated, knees bent, and back straight.
- Place one of your hands on the care recipient’s shoulder and the other on the hip.
- Gently roll care recipient toward you OR push them away from you.
- Make sure care recipient is in good alignment.
- Place pillows in appropriate areas for comfort and support:
- Against the back;
- Under head and shoulder;
- In front of bottom leg;
- Top leg on a pillow in a flexed position;
- Under care recipient’s arm/hand
- Lower the bed.
- Wash your hands.
Turning techniques:
Draw sheet (lift sheet).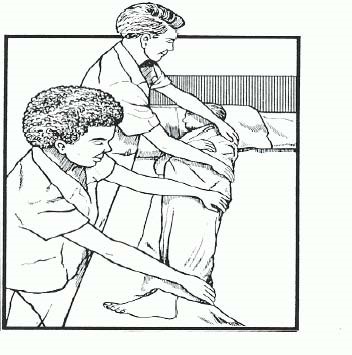
Log roll
To make turning and positioning a safe procedure for both you and your care recipient, remember the following basic rules:
- Always explain to the care recipient what you are going to do and why.
- Encourage the care recipient to help as much as possible.
- Always remember to lock the wheels on the bed.
- When safety rails are not provided on the bed, use common sense to provide safety measures during a procedure, such as moving the bed against a wall.
- If possible, raise the bed to a comfortable working height before performing a procedure and lower it when completed.
- Always provide privacy when performing a procedure.
- Use good body mechanics.
- Remember to protect any surgical tubing.
- Give the most support to the heaviest parts of the care recipient’s body. Usually, this is the trunk of the body, shoulders to hips.
- For the most support, hold the care recipient close to you when lifting.
- Move smoothly. Do not jerk.
- Tell your care recipient to move on the count of three when he/she is able to help you.
- The care recipient should be centered on the bed.
- Make sure the care recipient is comfortable before you leave. (Sitting Up when care recipients are eating, watching television, visiting, reading,)
-
Range of Motion
Principles/rationale for passive/active range of motion.
What are passive range of motion exercises?
Passive range of motion exercises help keep a person’s joints flexible, even if he cannot move by himself. Range of motion is how far the person’s joints can be moved in different directions. The exercises help you move all the person’s joints through their full range of motion.
What are passive range of motion exercises?
The range of movement through which a client can actively (without assistance) move a joint using the adjacent muscles. To maintain joint mobility is done by putting each of the client’s joints through all possible movements to increase and/or maintain movement in each joint. To prevent contracture, atony (insufficient muscular tone), and atrophy of muscles. To stimulate circulation, preventing thrombus and embolus formation.
Joint Movements
- Adduction/ abduction;
- Flexion/ extension;
- Hyperextension;
- Internal/external rotation;
- Supine/pronation.
Guidelines for ROM exercises:

To maintain function, flexibility, and strength, clients need to use their muscle and joints. PW perform exercises as directed by licensed staff and according each client’s plan. Stop immediately if pain or discomfort occurs. Ask the person to tell you if he or she experiences pain during exercise, and stop ROM exercises whenever pain is indicated. Never exercise a joint that is red or swollen.
- Position the client in good body alignment for exercising.
- Explain what you are doing and why.
- Do only the exercises that you know how to do, as directed in the care plan.
- Support each limp as you move it gently and smoothly through its normal range.
- Observe any increase or decrease in mobility.
- Never force a joint or move it beyond the person comfort point.
- Exercise one side completely, and then the other side.
- Generally each exercise is repeated several times, twice a day.
ASSISTING THE CLIENT WITH PASSIVE RANGE-OF-MOTION EXERCISES
- Explain procedure to the client.
- Wash hands.
- Hold the extremity to be exercised gently but firmly with the flat of hand and fingers.
- Move the extremity smoothly and firmly as far as it can go, comfortably, in every direction.
- Repeat as often as stated on the Care Plan.
- Place the extremity back in its natural position at the end of the exercise.
- Observe for any difficulty doing the exercise.
- Record and reports the number of times the exercise was performed and any difficulty with the exercise.
- Observe, record and reports any changes in condition or behavior.
- Washed hands.
-
Transferring.
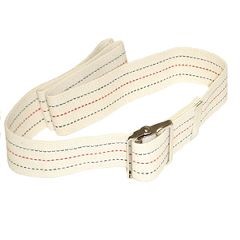
Some care recipients will need assistance with transferring or moving from one place to another. This may include getting into a sitting or standing position and moving from the bed to a chair and back. It is important that this is done with the least amount of stress to the care recipient and to you. Care recipients will have confidence in you when you know your strength and your capabilities and stay within those limits. Care recipients should be allowed to do as much as possible for themselves. As they become stronger, the amount of help you provide will decrease; but, stay with them, give directions, and help where needed. Be alert for problems such as weakness or dizzy spells, which could cause them to fall. Older people often get dizzy when changing positions, so do the procedures slowly, allowing them time to adjust to the position changes. A transfer belt, or gait belt, can help with the work of transferring, especially with heavier care recipients. A transfer belt is made out of canvas or leather and is fastened around their waist. It should be wide enough and heavy enough for the care recipient you are using it on. The belt is used by you to grasp with your hands to assist with moving or transferring. Remember that you and the care recipient must use good body mechanics when doing these procedures to make sure they are done safely. Have a good base of support, keep the back straight, and bend the knees.
Use of assistive devices and different transfer techniques in transferring clients:
1. Chair
2. Gait belt
3. Mechanical lifters (Hoyer)
4. Slide board
5. Lift sheet (draw sheet).
7. Wheelchair

When helping the care recipient to sit in a chair, first think about the type of chair you should use. Consider the following points:
- Does the chair provide good support to the care recipient’s back? A straight back chair is often the best.
- Which chair gives the care recipient the most independence? One with arms is easier to get in and out of. Both a reclining chair and a low chair are difficult to get out of.
- What types of chairs are available? Varieties of chairs include living room chairs, kitchen/dining room chairs, and wheelchairs.
- Which chair is the safest? Chairs with arms, stable legs, loose parts, etc. are safest.
- Can the care recipient sit with the feet resting comfortably on the floor? If not a shorter chair may be more appropriate.
A wheelchair can provide good support and allow the care recipient freedom to move around the house. Always remember to lock the brakes on the wheelchair when moving to or from it. Make sure moving to or from the chair will be safe by considering where the leg extenders and wheels are located.
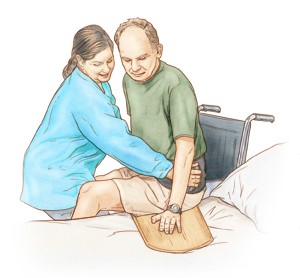
Assisting with a Standard Sit and Transfer
- Wash your hands.
- Explain to the care recipient what you are going to do.
- The care recipient should be in a sitting position with the transfer belt around the waist.
- Have the care recipient move forward on the bed or chair and place his/her hands on the chair arms or on the bed. If going to or from a wheelchair, make sure the brakes are locked.
- Place one of your knees between the care recipient’s and the other knee bracing their knee. You should be close to the chair or bed.
- Grasp the transfer belt and instruct the care recipient, on the count of three, to push down with hands, lean forward and stand. (If not using a transfer belt, grasp them under their arms, circling with your arms at their center of gravity.)
- Reverse the procedure when assisting the care recipient to sit.
- When sitting, have the care recipient feel for the bed or chair with the back of his/her legs and to reach back for the bed or chair arms.
- Make the care recipient comfortable.
- Wash your hands.
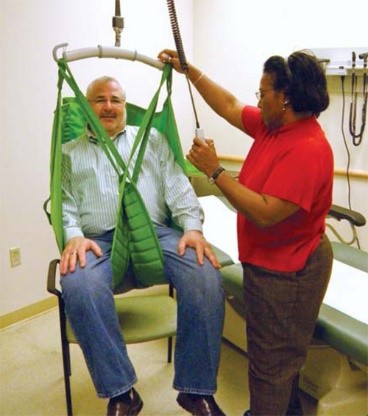
HOYER LIFT
The Hoyer lift is a mechanical lift used to move the care recipient. It might also be called a hydraulic lift or mechanized bath chair. Never use this lift to transport care recipients from one place to another. Guidelines for Using a Hoyer Lift Safety is a major issue when using the Hoyer lift, so consider these guidelines when using it:
- Check the lift to be sure it is safe to use—containing no loose parts, working properly, etc.
- Make sure the sling is safe with no rips, etc.
- Use the right size of sling for your care recipient.
- The sling should reach from the shoulders to the knees.
- Get as many wrinkles out of the sling as possible.
- When attaching the sling, the hooks should point away from the care recipient’s body.
- When positioning the lift in place, spread the base, or legs, for better support.
- Lock the wheels once lift is in place and before lifting the care recipient. Be sure to relock them when lowering the care recipient.
- Have the care recipient fold arms across the chest.
- Check the security of the sling as you raise the lift to be sure the connections have not come loose.
Use care when lowering the lift to protect the skin and the feet.
-
Ambulation.
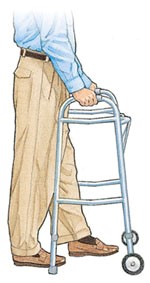
Ambulation is the action of walking for which the care recipient may need your help. The physical therapist will set up a plan for both of you to follow. The different types of equipment used to help support people when walking include canes, crutches, and walkers. Each device is adjusted by the physical therapist for a specific elder. The place where the elder holds the walking device should be level with the hip, with the elbow slightly bent. NEVER readjust the devices yourself. Mobility means to move from place to place. Ambulation devices increase mobility. Sometimes, these devices are not enough to allow the care recipient mobility. A wheelchair may be needed instead. The use of a wheelchair involves some special considerations. Remembering to lock the brakes on the wheels when transferring the care recipient into and out of it is very important. Always push the wheelchair from behind except for in an elevator and going down a ramp when you should pull the wheelchair.
Assistive devices in ambulation
1. Gait belt (transfer belt).

2. Cane, Quad cane, Hemi cane
3. Walker
4. Crutches
5. Whealchair.
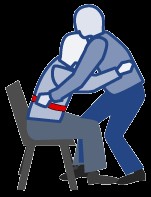
Using a Transfer Belt
- Wash your hands.
- Explain to the care recipient what you are going to do.
- Assist the care recipient to a sitting position.
- Apply the belt around the care recipient’s waist over clothing. Never apply the belt over bare skin.
- Tighten the belt so it fits snugly. Provide only enough room for your hands to fit under it. The buckle should be at the side or back of the care recipient.
- Stand in front of the care recipient and grasp the belt from underneath and at the sides. Use good body mechanics.
- Have the care recipient push up with hands from the bed or chair.
- Brace your knees and feet against the care recipient’s body.
- Raise and lower the care recipient using good body mechanics.
- Wash your hands when completed.
A transfer belt is used when a client has a problem changing to a new position, when they need assistance, or a boost. Use the belt to grasp the client and help lift or guide them through a transfer or to walk. Personal care PCP/PCW ‘s are expected to have the transfer belt handy at all times.
Guidelines for using the transfer belt for a sit-stand-sit transfer: Plan ahead. Think through the transfer.
- Position the chair or commode at an angle from the client’s current sitting position on their stronger side.
- Apply the belt snugly around the person’s waist, over clothing. Avoid pinching excess skin with the belt. (Place the belt under the pendulous breasts of a woman, above the large abdomen).
- Tuck in the tail of the belt.
- Be sure the client has shoes or non-skid house-shoes on.
- Explain what you will do and what the client needs to do.
- Tell the client to move to the forward edge of the bed or chair. Be sure their feet are flat on the floor. You may need to help by placing one hand behind their hips and the other under their thighs. Ease the client forward in the chair. Follow the “back protection guidelines” and get as much help as you can from the client.
- Be aware that the client’s skin can be injured by abruptly sliding across the chair or from your applying too much pressure with your fingertips as you move them.
- Position yourself directly in front of the client. Place your feet apart to give you a broad base of support. Block their feet with your feet. Brace your knees against the client’s knees. Bend your knees; keep your back as steady as possible. (Keep a relaxed back and allow for the natural curve at your waist. Leaning or bending slightly forward is okay.) If the client is able, have them assist by pushing off from the chair or bed. If unable to assist, have the client place their hands on your shoulders or upper arms (but not around your neck).
- Grasp the belt at the sides or around the back of the client with fingertips pointed upward.
- Count to three. On three, assist the client to a standing position and pause long enough for them to feel steady.
- Direct the client to step or pivot in the direction of the commode or chair, then, back up until they can feel the edge of the chair on their calves. Firmly guide them in that direction, keeping your knees braced against theirs.
- Keep a firm grip on the transfer belt and keep the client close to your center of gravity. Move with them.
- Instruct the client to place their hands on the arms of the chair and to sit when ready.
- Slowly bend your knees, keep your back straight, and lower the client into the chair or commode. Remove the belt.
- You should always have the client move toward the stronger side during transfers and when getting out of bed. The strong side moves first and pulls the weaker side along.
Using a Cane
- Wash your hands.
- Explain to the care recipient what you are going to do.
- Make sure care recipient is appropriately dressed.
- Apply a transfer belt and help the care recipient to stand.
- Have the care recipient grip the cane for support. ☺ Single point cane – usually held with strong side ☺ 3 – 4 point cane – usually held with weak side.
- The care recipient moves the cane forward, usually about 12”.
- The care recipient moves the feet forward – usually weak leg first, then strong leg.
- Assist the care recipient as needed.
- Wash your hands after completed with procedure.
Using a Walker
- Wash your hands.
- Explain to the care recipient what you are going to do.
- Make sure care recipient is appropriately dressed.
- Apply a transfer belt and help the care recipient to stand.
- Have the care recipient hold firmly onto the side grips of the walker.
- Lift and move the walker 8 – 12” forward, using the arms to lift, not the back. Feet should be kept still. 7. The care recipient then moves the feet forward, while holding the walker still with his/her hands. Move a weak leg first.
- Assist the care recipient as necessary.
- When completed with procedure, wash your hands.
Assisting with Walking
These techniques should be followed when walking with any unstable or elderly person, even if he is not using an assistive device, like a walker or cane. ··
- Stand on the client’s weaker side and a little behind. Keep one hand ready by the client’s waist. Use your other arm to hold the client’s upper arm that is closest to you. If the client begins to fall, you are in a good position to support the client and ease them to the floor.
- If the transfer belt is used, apply it before the client begins to walk. Stand on the weaker side and a little behind the client. With your hand that is closer to the client, grasp the gait belt at the client’s waist, at their side or back. With your other hand, hold the client’s upper arm or forearm.
- While walking with the client, start with the same foot the client does and keep in step. Encourage the client to look up when they are walking. Accidents are more likely to happen when the client is looking down.
- While helping the client to walk upstairs, stay a step or two below the client and grasp the transfer belt.
- While helping a client walk downstairs, walk behind them. If they begin to fall they can be pulled toward your thigh.
Do not walk on the stairs with an unreliable, unsteady, tottering client, or one who cannot totally support their weight.
Assisting a Falling Client
A client can lose balance at any time during a transfer, while walking, or during a simple change of position. Follow these guidelines to protect both the client and yourself from injury during a fall:
- Keep your back straight, feet apart and knees flexible. Stay close to the client, giving firm, steady support.
- If possible, ease the client down the side of your body and down your leg to the floor. Be sure to protect their head.
- Maintain a calm attitude. Reassure the client that you will remain with them.
- Once your client is on the floor, allow them to move into a comfortable position and rest briefly. Check them for injuries; ask about pain.
- Do not attempt to move an injured client.
- If the client appears to be injured, follow the agency guidelines for emergency procedures.
- Cover client with a light blanket or sheet while waiting for help to arrive.
- If the client does not seem to be injured, follow the guidelines for “Assisting a Fallen Client Up from the Floor”.
Assisting a Fallen Client Get Up from the Floor
If a client falls or slides out of a chair, but is alert, uninjured, and able to follow directions, use these guidelines:
- Do not attempt to pull or lift the client up from the floor.
Verbally direct the client to roll over onto their side and then onto their hands and knees.
- Place a chair in front of them and hold it firmly.
(A wheelchair with locked wheels will work as well).
- Instruct the client to use the seat of the chair to pull themselves up to a kneeling position and then to a standing position.
- Use the transfer belt to help guide the client to their feet from the kneeling position.
- Have a chair at a right angle to the first chair, ready to seat the client after rising.
- If the client is unable to help themselves out of their situation, call for help. Follow agency procedures or your supervisor’s instructions.
Helping a Client Walk with a Cane or Walker.
Using a Cane:
- The client should hold the cane on their strong side.
- Client should take the first step with the strong leg.
- Move the cane and the weak leg at the same time for the next step.
- “Strong, Weak + Cane”
Using a Walker:
- Have the client hold both handgrips of the walker.
- The client should pick up the walker rather than pushing it.
- The client’s first step should be with the weak leg.
- The second step should be with the strong leg.
- “Walker, Weak, Strong”
- The client should remain inside the walker, not lean over it or push it too far ahead.
Helping with a Device:
- Encourage the client to look up when walking with a cane or walker.
- Apply the transfer belt, if directed.
- Stand on the weaker side and a little behind the client.
- Keep one arm ready by the client’s waist.
- Keep your other arm by the client’s upper arm. It should be closest to you – or grasp the back of the transfer belt.
Rising from a Wheelchair with a Walker or Cane:
- Have the client sit on the edge of the chair and hold onto the armrests.
- Lean the cane or walker against the chair.
- The client should lean slightly forward and push themselves up, using the armrests.
- The client should not hold onto the walker for support while rising from a chair because it may cause them to fall.
- Once standing, the client can start using the cane or walker.
Sitting with a Walker or Cane:
- Have client stand with back to chair, legs touching edge of seat.
- Have client reach behind themselves and hold the armrests.
- Client should lean forward slightly and lower themselves to the chair by bending their legs.
- Once seated, the client can slide back into a comfortable position.
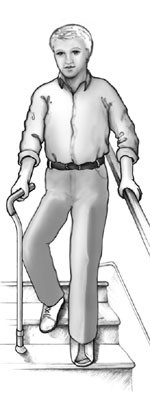
Climbing Upstairs with a Cane:
- Have the client take the first step with the strong leg.
- Next, move cane and weaker leg at the same time to go up the step.
- “Strong, weak, cane”
Going Down Stairs with a Cane:
- Have the client take the first step with the weak leg and cane together.
- The second step should be with the strong leg.
- “Weak, Cane. Strong.”
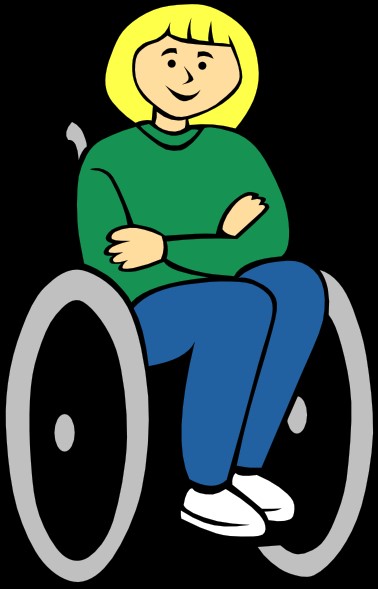
Using a Wheelchair
Using a Wheelchair to Transport a Client
- Place the wheelchair at a right-angle to the client.
- Lock the wheels of the wheelchair and raise or remove the footrests.
- Transfer the client to the wheelchair.
- Use the transfer belt if necessary.
- Assist the client into a safe and comfortable sitting position.
- Stand behind the client with one foot forward, knees bent.
- Brace one knee against the back of the chair.
- Have the client fold their arms across their chest.
- Reach under client’s am1s. Grip crossed forearms with your hands.
- Pull client toward you and the back of the wheelchair so their buttocks are on the back of seat.
- Position the client in good alignment with their feet on the footrests of the chair.
- Pull by stepping back and using your body weight to assist in sliding the patient back. (Do not pull with your arms only.)
- Position the client so there is no possibility the client will slide or fall forward from the seat.
- Cover the client with a light blanket if desired.
- Position the client’s feet on the footrests.
- Unlock the brakes.
- Guide the chair from behind following these basic precautions:
- a) Back down slanted ramps.
- b) Back into and out of doorways after carefully checking for clearance.
- c) Always put the brakes on when the wheelchair is stopped.
Guidelines for Wheelchair Transport – One Step:
- Secure patient in chair with safety strap and sheet ties around patient, etc.
- If patient has poor sitting balance, this step is absolutely necessary:
- The patient should always face uphill, regardless of what direction you’re moving, either up or down the steps.
Going Down a Step with an Unreliable Client:
- Tilt the chair onto its rear wheels.
- Check the client’s feet to be sure they are on the footrests.
- Elevate the footrests if possible.
- You step down, off step.
- Keep the chair balanced against your thighs.
- Maintain the center of gravity for the chair and within (or near) your center of gravity.
- Slowly roll the chair down and off the step, backward (downhill), until both rear wheels are on the ground.
- With chair still balanced on its rear wheels, back up far enough to allow the front wheels to lower to ground.
- Slowly continue backing up until the chair rests evenly.
Going Up a Step:
- Have the patient face uphill.
- Stand behind the chair.
- Tilt the chair back onto the rear wheels (Push on pegs behind rear wheels. – Use your body weight.)
- If patient is heavy, keep front wheels in the air.
- Balance the back of the chair against your thighs until the front wheels clear the step.
- Lower the front wheels onto the upper level.
- Bend your knees, put your hands below the chair grips and push the chair up onto the upper level.
- Use your body weight to push and roll chair up over the step.
- Do not lift the rear wheels onto the step.
- For light patients, you may be able to lift, but if in doubt, do not try to lift.
Going Down: (Reliable Light-Weight Patient)
- Face the wheelchair toward the stair.
- Tilt the wheelchair back onto its rear wheels. Keep the chair snug against your body
- Do not allow the chair to move out from you. Do not let go of the handles.
- With chair balanced on rear wheels, slowly push chair forward, off the step.
- Be sure you have co11trol of the chair.
- Keep the back of the chair tilted against your thighs.
- Once the wheels are over the edge of the step, lower rear wheels to ground
- Then slowly lower front wheels to ground.
- Proceed forward.
- If you feel unable to control the patient or the chair, use the face-first, back down method.
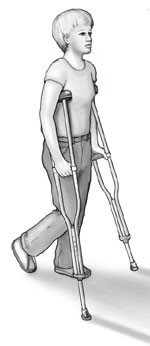
Using Crutches
- Wash your hands.
- Explain to the care recipient what you are going to do.
- Make sure care recipient is appropriately dressed.
- Apply a transfer belt and help the care recipient to stand.
- Care recipient grasps the crutches. There should be a two-finger width between the armpit and crutch arm. Their arm is slightly bent and crutches held 6 – 8” away from the heel.
- Swing Through Gait – no weight bearing on one leg. a. Place crutches 6 – 12” ahead b. Lift and swing body slightly ahead of crutches c. Bring crutches in front of body and repeat.
- Four Point Gait – can bear weight on both legs.
– Move right crutch forward 6 – 8”;
– Move left foot forward;
– Move left crutch forward;
– Move right foot forward;
– Repeat.
- Going Down Steps a. Put crutches down on step first b. Bring strong leg down, then weak leg c. Repeat until at bottom of steps.
- Going Up Steps a. Crutches and legs on same step b. Move up strong leg and put weight on it c. Move up crutches and weak leg d. Repeat until at top of stairs.
- Wash your hands when completed with procedure.